Manual:IP/DHCP Relay: Difference between revisions
m relay-info-remote-id |
|||
| (One intermediate revision by the same user not shown) | |||
| Line 57: | Line 57: | ||
|type=string | |type=string | ||
|default= | |default= | ||
|desc= | |desc=specified string will be used to construct Option 82 instead of client's MAC address. Option 82 consist of: interface from which packets was received + client mac address or '''relay-info-remote-id''' | ||
}} | }} | ||
Latest revision as of 12:45, 28 July 2016
Summary
DHCP Relay is just a proxy that is able to receive a DHCP request and resend it to the real DHCP server.
Properties
Sub-menu: /ip dhcp-relay
| Property | Description |
|---|---|
| add-relay-info (yes | no; Default: no) | Adds DHCP relay agent information if enabled according to RFC 3046. Agent Circuit ID Sub-option contains mac address of an interface, Agent Remote ID Sub-option contains MAC address of the client from which request was received. |
| delay-threshold (time | none; Default: none) | If secs field in DHCP packet is smaller than delay-threshold, then this packet is ignored |
| dhcp-server (string; Default: ) | List of DHCP servers' IP addresses which should the DHCP requests be forwarded to |
| interface (string; Default: ) | Interface name the DHCP relay will be working on. |
| local-address (IP; Default: 0.0.0.0) | The unique IP address of this DHCP relay needed for DHCP server to distinguish relays. If set to 0.0.0.0 - the IP address will be chosen automatically |
| relay-info-remote-id (string; Default: ) | specified string will be used to construct Option 82 instead of client's MAC address. Option 82 consist of: interface from which packets was received + client mac address or relay-info-remote-id |
| name (string; Default: ) | Descriptive name for the relay |
DHCP relay does not choose the particular DHCP server in the dhcp-server list, it just send the incoming request to all the listed servers.
Example setup
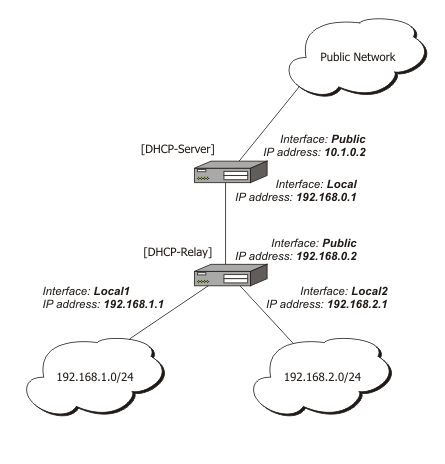
Let us consider that you have several IP networks 'behind' other routers, but you want to keep all DHCP servers on a single router. To do this, you need a DHCP relay on your network which relies DHCP requests from clients to DHCP server.
This example will show you how to configure a DHCP server and a DHCP relay which serve 2 IP networks - 192.168.1.0/24 and 192.168.2.0/24 that are behind a router DHCP-Relay.

IP Address Configuration
IP addresses of DHCP-Server:
[admin@DHCP-Server] ip address> print
Flags: X - disabled, I - invalid, D - dynamic
 #   ADDRESS            NETWORK         BROADCAST       INTERFACE
 0   192.168.0.1/24     192.168.0.0     192.168.0.255   To-DHCP-Relay
 1   10.1.0.2/24	10.1.0.0	10.1.0.255	Public
[admin@DHCP-Server] ip address>
IP addresses of DHCP-Relay:
[admin@DHCP-Relay] ip address> print
Flags: X - disabled, I - invalid, D - dynamic
 #   ADDRESS            NETWORK         BROADCAST       INTERFACE
 0   192.168.0.2/24     192.168.0.0     192.168.0.255   To-DHCP-Server
 1   192.168.1.1/24     192.168.1.0     192.168.1.255   Local1
 2   192.168.2.1/24     192.168.2.0     192.168.2.255   Local2
[admin@DHCP-Relay] ip address>
DHCP Server Setup
To setup 2 DHCP Servers on DHCP-Server router add 2 pools. For networks 192.168.1.0/24 and 192.168.2.0:
/ip pool add name=Local1-Pool ranges=192.168.1.11-192.168.1.100
/ip pool add name=Local1-Pool ranges=192.168.2.11-192.168.2.100
[admin@DHCP-Server] ip pool> print
 # NAME                                         RANGES
 0 Local1-Pool                                  192.168.1.11-192.168.1.100
 1 Local2-Pool                                  192.168.2.11-192.168.2.100
[admin@DHCP-Server] ip pool>
Create DHCP Servers:
/ip dhcp-server add interface=To-DHCP-Relay relay=192.168.1.1 \
   address-pool=Local1-Pool name=DHCP-1 disabled=no
/ip dhcp-server add interface=To-DHCP-Relay relay=192.168.2.1 \
   address-pool=Local2-Pool name=DHCP-2 disabled=no
[admin@DHCP-Server] ip dhcp-server> print
Flags: X - disabled, I - invalid
 #   NAME         INTERFACE     RELAY           ADDRESS-POOL LEASE-TIME ADD-ARP
 0   DHCP-1       To-DHCP-Relay 192.168.1.1     Local1-Pool  3d00:00:00
 1   DHCP-2       To-DHCP-Relay 192.168.2.1     Local2-Pool  3d00:00:00
[admin@DHCP-Server] ip dhcp-server>
Configure respective networks:
/ip dhcp-server network add address=192.168.1.0/24 gateway=192.168.1.1 \
   dns-server=159.148.60.20
/ip dhcp-server network add address=192.168.2.0/24 gateway=192.168.2.1 \
   dns-server 159.148.60.20
[admin@DHCP-Server] ip dhcp-server network> print
 # ADDRESS            GATEWAY         DNS-SERVER      WINS-SERVER     DOMAIN
 0 192.168.1.0/24     192.168.1.1     159.148.60.20
 1 192.168.2.0/24     192.168.2.1     159.148.60.20
[admin@DHCP-Server] ip dhcp-server network>
DHCP Relay Config
Configuration of DHCP-Server is done. Now let's configure DHCP-Relay:
/ip dhcp-relay add name=Local1-Relay interface=Local1 \
   dhcp-server=192.168.0.1 local-address=192.168.1.1 disabled=no
/ip dhcp-relay add name=Local2-Relay interface=Local2 \
   dhcp-server=192.168.0.1 local-address=192.168.2.1 disabled=no
[admin@DHCP-Relay] ip dhcp-relay> print
Flags: X - disabled, I - invalid
 #   NAME                        INTERFACE      DHCP-SERVER     LOCAL-ADDRESS
 0   Local1-Relay                Local1         192.168.0.1     192.168.1.1
 1   Local2-Relay                Local2         192.168.0.1     192.168.2.1
[admin@DHCP-Relay] ip dhcp-relay>
[ Top | Back to Content ]
