Manual:Hurricane Electric Tunnel Broker Example for Home: Difference between revisions
Tunnel Broker IPv6 Tunnel Example |
No edit summary |
||
| (One intermediate revision by one other user not shown) | |||
| Line 1: | Line 1: | ||
{{Versions|v6.34+}} | {{Versions|v6.34+}} | ||
{{ Warning | This article will not be updated and will be kept for archival purposes.}} | |||
Following example will show how to get IPv6 connectivity on a RouterOS device through IPv4 network using 6to4 tunnel. | Following example will show how to get IPv6 connectivity on a RouterOS device through IPv4 network using 6to4 tunnel. | ||
| Line 14: | Line 17: | ||
local-address=194.105.56.170 mtu=1280 name=sit1 remote-address=216.66.80.90 | local-address=194.105.56.170 mtu=1280 name=sit1 remote-address=216.66.80.90 | ||
/ipv6 route add comment="" disabled=no distance=1 dst-address=2000::/3 gateway=2001:470:27:37e::1 \ | /ipv6 route add comment="" disabled=no distance=1 dst-address=2000::/3 gateway=2001:470:'''27''':37e::1 \ | ||
scope=30 target-scope=10 | scope=30 target-scope=10 | ||
/ipv6 address add address=2001:470:27:37e::2/64 advertise=no disabled=no eui-64=no interface=sit1 | /ipv6 address add address=2001:470:'''27''':37e::2/64 advertise=no disabled=no eui-64=no interface=sit1 | ||
These commands will setup the tunnel itself - the router will be able to connect to IPv6 hosts, but end-user devices (computers, tablets, phones) will not yet have IPv6 connectivity. | These commands will setup the tunnel itself - the router will be able to connect to IPv6 hosts, but end-user devices (computers, tablets, phones) will not yet have IPv6 connectivity. | ||
To be able to assign IPv6 addresses to your clients you have to add the Routed IPv6 Prefix to your internal interface (by default bridge-local) | To be able to assign IPv6 addresses to your clients you have to add the Routed IPv6 Prefix to your internal interface (by default bridge-local) | ||
/ipv6 address add address=2001:470:28:37e:: interface=bridge-local advertise=yes | /ipv6 address add address=2001:470:'''28''':37e:: interface=bridge-local advertise=yes | ||
Enable DNS server advertising through network discovery | Enable DNS server advertising through network discovery | ||
/ipv6 nd set [ find default=yes ] advertise-dns=yes | /ipv6 nd set [ find default=yes ] advertise-dns=yes | ||
And | And finally add IPv6 DNS servers (these are Google public DNS servers, you can also use the one which is provided by Hurricane Electric - 2001:470:20::2) | ||
/ip dns set allow-remote-requests=yes servers=2001:4860:4860::8888,2001:4860:4860:: | /ip dns set allow-remote-requests=yes servers=2001:4860:4860::8888,2001:4860:4860::8844 | ||
Afterwards enable IPv6 on your device and you should have IPv6 connectivity. http://ipv6-test.com can be used to test IPv6 connectivity | Afterwards enable IPv6 on your device and you should have IPv6 connectivity. http://ipv6-test.com can be used to test IPv6 connectivity | ||
Latest revision as of 13:13, 24 March 2021
Following example will show how to get IPv6 connectivity on a RouterOS device through IPv4 network using 6to4 tunnel.
To be able to create the tunnel, you have to have a public IPv4 address and enable ping from Tunnel Broker IPv4 server.
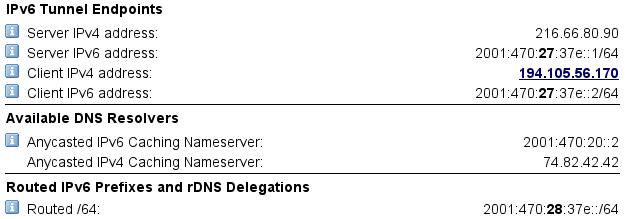
When you create a tunnel using Hurricane Electric Tunnel Broker, you will be given a routed /64 IPv6 prefix and additional information necessary for setting up the tunnel:
This example presumes that your public IPv4 address is 194.105.56.170
Hurricane Electric provides ready to use commands for RouterOS in the 'Example Configurations' section:
/interface 6to4 add comment="Hurricane Electric IPv6 Tunnel Broker" disabled=no \
 local-address=194.105.56.170 mtu=1280 name=sit1 remote-address=216.66.80.90
/ipv6 route add comment="" disabled=no distance=1 dst-address=2000::/3 gateway=2001:470:27:37e::1 \
 scope=30 target-scope=10
/ipv6 address add address=2001:470:27:37e::2/64 advertise=no disabled=no eui-64=no interface=sit1
These commands will setup the tunnel itself - the router will be able to connect to IPv6 hosts, but end-user devices (computers, tablets, phones) will not yet have IPv6 connectivity.
To be able to assign IPv6 addresses to your clients you have to add the Routed IPv6 Prefix to your internal interface (by default bridge-local)
/ipv6 address add address=2001:470:28:37e:: interface=bridge-local advertise=yes
Enable DNS server advertising through network discovery
/ipv6 nd set [ find default=yes ] advertise-dns=yes
And finally add IPv6 DNS servers (these are Google public DNS servers, you can also use the one which is provided by Hurricane Electric - 2001:470:20::2)
/ip dns set allow-remote-requests=yes servers=2001:4860:4860::8888,2001:4860:4860::8844
Afterwards enable IPv6 on your device and you should have IPv6 connectivity. http://ipv6-test.com can be used to test IPv6 connectivity


