Manual:Interface/IPIP: Difference between revisions
No edit summary |
No edit summary |
||
| Line 58: | Line 58: | ||
</table> | </table> | ||
<br /> | |||
{{Note | | |||
There is no authentication or 'state' for this interface. The bandwidth usage of the interface may be monitored with the monitor feature from the interface menu.}} | {{Note | There is no authentication or 'state' for this interface. The bandwidth usage of the interface may be monitored with the monitor feature from the interface menu.}} | ||
<h2>Setup examples</h2> | <h2>Setup examples</h2> | ||
Revision as of 13:47, 9 March 2010
Summary
Sub-menu: /interface ipip
Standards: IPIP RFC 2003
The IPIP tunneling implementation on the MikroTik RouterOS is RFC 2003 compliant. IPIP tunnel is a simple protocol that encapsulates IP packets in IP to make a tunnel between two routers. The IPIP tunnel interface appears as an interface under the interface list. Many routers, including Cisco and Linux based, support this protocol. This protocol makes multiple network schemes possible.
IP tunneling protocol adds the following possibilities to a network setups:
- to tunnel Intranets over the Internet
- to use it instead of source routing
Properties
| Property | Description |
|---|---|
| local-address (IP; Default: ) | IP address on a router that will be used by IPIP tunnel |
| mtu (integer; Default: 1500) | Layer3 Maximum transmission unit |
| name (string; Default: ) | Interface name |
| remote-address (IP; Default: ) | IP address of remote end of IPIP tunnel |

Note: There is no authentication or 'state' for this interface. The bandwidth usage of the interface may be monitored with the monitor feature from the interface menu.
Setup examples
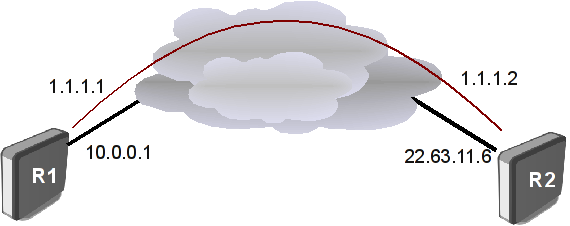
Suppose we want to add an IPIP tunnel between routers R1 and R2:
At first, we need to configure IPIP interfaces and then add IP addresses to them.
The configuration for router R1 is as follows:
[admin@MikroTik] interface ipip> add
local-address: 10.0.0.1
remote-address: 22.63.11.6
[admin@MikroTik] interface ipip> print
Flags: X - disabled, R - running
  #    NAME                               MTU   LOCAL-ADDRESS   REMOTE-ADDRESS
  0 X  ipip1                              1480  10.0.0.1        22.63.11.6

[admin@MikroTik] interface ipip> en 0
[admin@MikroTik] interface ipip> /ip address add address 1.1.1.1/24 interface=ipip1
The configuration of the R2 is shown below:
[admin@MikroTik] interface ipip> add local-address=22.63.11.6 remote-address=10.
0.0.1
[admin@MikroTik] interface ipip> print
Flags: X - disabled, R - running
  #    NAME                               MTU   LOCAL-ADDRESS   REMOTE-ADDRESS
  0 X  ipip1                              1480  22.63.11.6      10.0.0.1

[admin@MikroTik] interface ipip> enable 0
[admin@MikroTik] interface ipip> /ip address add address 1.1.1.2/24 interface=ipip1
Now both routers can ping each other:
[admin@MikroTik] interface ipip> /ping 1.1.1.2
1.1.1.2 64 byte ping: ttl=64 time=24 ms
1.1.1.2 64 byte ping: ttl=64 time=19 ms
1.1.1.2 64 byte ping: ttl=64 time=20 ms
3 packets transmitted, 3 packets received, 0% packet loss
round-trip min/avg/max = 19/21.0/24 ms
[admin@MikroTik] interface ipip>
[ Top | Back to Content ]

