Manual:CHR: Difference between revisions
m →Hyper-V: images |
|||
| Line 39: | Line 39: | ||
======[[Manual:CHR_VirtualBox_installation|VirtualBox]]====== | ======[[Manual:CHR_VirtualBox_installation|VirtualBox]]====== | ||
======[[Manual:CHR_Hyper-V_installation|Hyper-V]]====== | ======[[Manual:CHR_Hyper-V_installation|Hyper-V]]====== | ||
======[[Manual:CHR_AWS_installation|Amazon Web Services (AWS)]]====== | ======[[Manual:CHR_AWS_installation|Amazon Web Services (AWS)]]====== | ||
Revision as of 11:28, 14 July 2016
Cloud Hosted Router
Cloud Hosted Router (CHR) is a RouterOS version intended for running as a virtual machine. It supports the x86 64-bit architecture and can be used on most of the popular hypervisors such as VMWare, Hyper-V, VirtualBox, KVM and others. CHR has full RouterOS features enabled by default but has a different licensing model than other RouterOS versions.
System Requirements
Minimal requirements:
- 64bit CPU with virtualisation support
- 128 MB or more RAM for the CHR instance
- 128 MB disk space for the CHR virtual hard drive
CHR has been tested on the following platforms:
- VirtualBox 5 on Linux and OS X
- VMWare Fusion 7 and 8 on OS X
- Qemu 2.4.0.1 on OS X
- Hyper-V on Windows Server 2012 (Only Generation 1 Hyper-V virtual machine is supported at the moment)
How to Install CHR
We provide 4 different virtual disk images to choose from:
- RAW disk image (.img file)
- VMWare disk image (.vmdk file)
- Hyper-V disk image (.vhdx file)
- VirtualBox disk image (.vdi file)
Steps to install CHR
- Step1: Download virtual disk image for your hypervisor
- Step2: Create a guest virtual machine
- Step3: Use previously downloaded image file as a virtual disk drive
- Step4: Start the guest CHR virtual machine
- Step5: Log in to your new CHR. Default user is 'admin', without password
Installing CHR
VMWare Fusion / Workstation
VirtualBox
Hyper-V
Amazon Web Services (AWS)
CHR Licensing
The CHR has 4 license levels:
- free
- p1 perpetual-1 ($45)
- p10 perpetual-10 ($95)
- p-unlimited perpetual-unlimited ($250)
60-day free trial license is available for all paid license levels. To get the free trial license, you have to have an account on MikroTik.com as all license management is done there.
Perpetual is a lifetime license (buy once, use forever). It is possible to transfer a perpetual license to another CHR instance.
A running CHR instance will indicate the time when it has to access the account server to renew it's license. If the CHR instance will not be able to renew the license it will behave as if the trial period has ran out and will not allow an upgrade of RouterOS to a newer version.
| License | Speed limit | Price |
|---|---|---|
| Free | 1Mbit | FREE |
| P1 | 1Gbit | $45 |
| P10 | 10Gbit | $95 |
| P-Unlimited | Unlimited | $250 |
Paid licenses
p1
p1 (perpetual-1) license level allows CHR to run indefinitely. It is limited to 1Gbps upload per interface. All the rest of the features provided by CHR are available without restrictions. It is possible to upgrade p1 to p10 or p-unlimited After the upgrade is purchased the former license will become available for later use on your account.
p10
p10 (perpetual-10) license level allows CHR to run indefinitely. It is limited to 10Gbps upload per interface. All the rest of the features provided by CHR are available without restrictions. It is possible to upgrade p10 to p-unlimited After the upgrade is purchased the former license will become available for later use on your account.
p-unlimited
The p-unlimited (perpetual-unlimited) license level allows CHR to run indefinitely. It is the highest tier license and it has no enforced limitations.
Free licenses
There are several options to use and try CHR free of charge.
free
The free license level allows CHR to run indefinitely. It is limited to 1Mbps upload per interface. All the rest of the features provided by CHR are available without restrictions. To use this, all you have to do is download disk image file from our download page and create a virtual guest.
60-day trial
To take advantage of increased data transfer speeds, you will have to have an account registered on MikroTik.com. Then you can request the desired license level for trial from your router that will assign your router ID to your account and enable a purchase of the license from your account. All the paid license equivalents are available for trial. A trial period is 60 days from the day of acquisition.
Getting the License
After the initial setup a CHR instance will have a free license assigned. From there, it is possible to upgrade the license to a higher tier. Once you have a trial license all the work with the license is done on the account server where it is possible to upgrade license to a higher tier unless it is p-unlimited already.
Upgrade from free to p1 or higher
Initial upgrade from the free tier to anything higher than that incurs CHR instance registration on the account server. To do that you have to enter your MikroTik.com username and password and a desired license level you want to acquire. As a result, a CHR ID number will be assigned to your account on the account server and 60-day trial created for that ID. There are 2 ways to obtain a license - using WinBox or RouterOS command line interface:
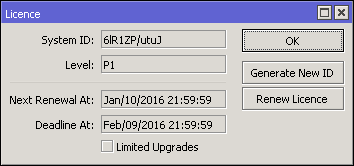
Using WinBox (Sytem -> License menu):
Using command line interface:
[admin@MikroTik] > /system license print
  system-id: 6lR1ZP/utuJ
      level: free

[admin@MikroTik] > /system license renew
account: mymikrotikcomaccount
password: *********************
level: p1
  status: done

[admin@MikroTik] > /system license print
        system-id: 6lR1ZP/utuJ
            level: p1
  next-renewal-at: jan/10/2016 21:59:59
      deadline-at: feb/09/2016 21:59:59
Upgrade from higher tier up
Only an upgrade to a higher tier is possible at the moment (for paid licenses only) and that is done in the account server. For changes to take place on the router itself renew command should be issued. When the router already has any kind of trial or paid license, the license level you set for the renew command is not important anymore, it is mandated by the account server. Possible upgrades are as follows:
- p1 upgrade to p10
- p1 upgrade to p-unlimited
- p10 upgrade to p-unlimited
To acquire a higher level trial, set up a new CHR instance, renew the license and select the desired level.
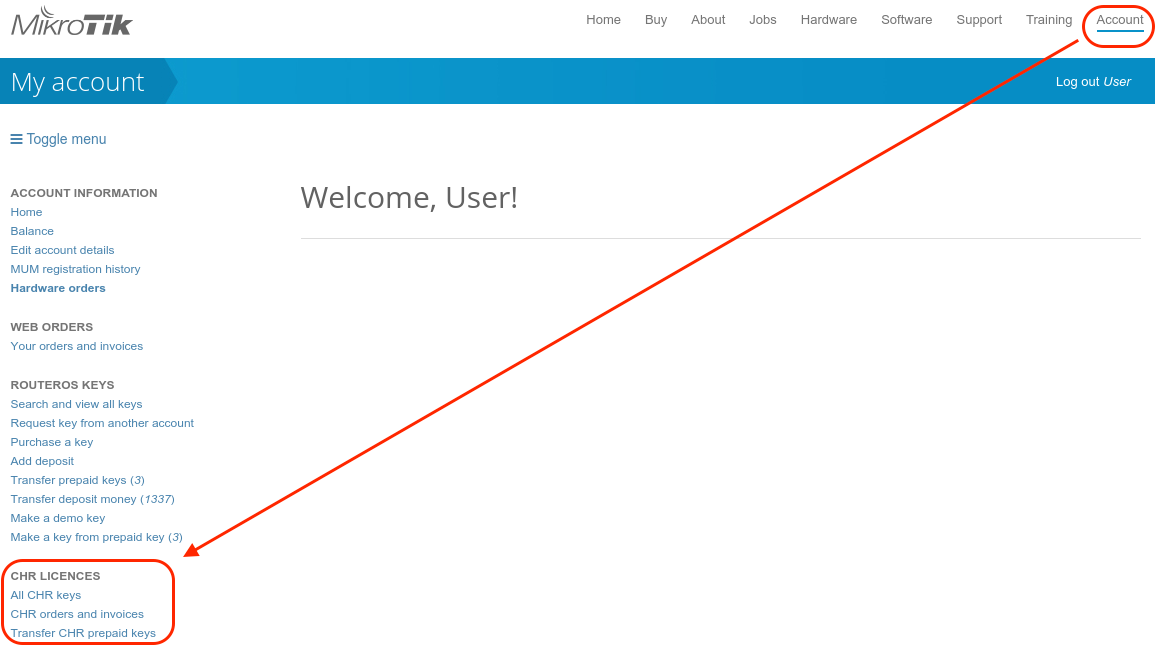
To upgrade from a Trial license to Paid go to MikroTik.com account server and choose 'all keys' in Cloud Hosted Router (CHR) section:
You will be presented with a list of your CHR machines and licenses:
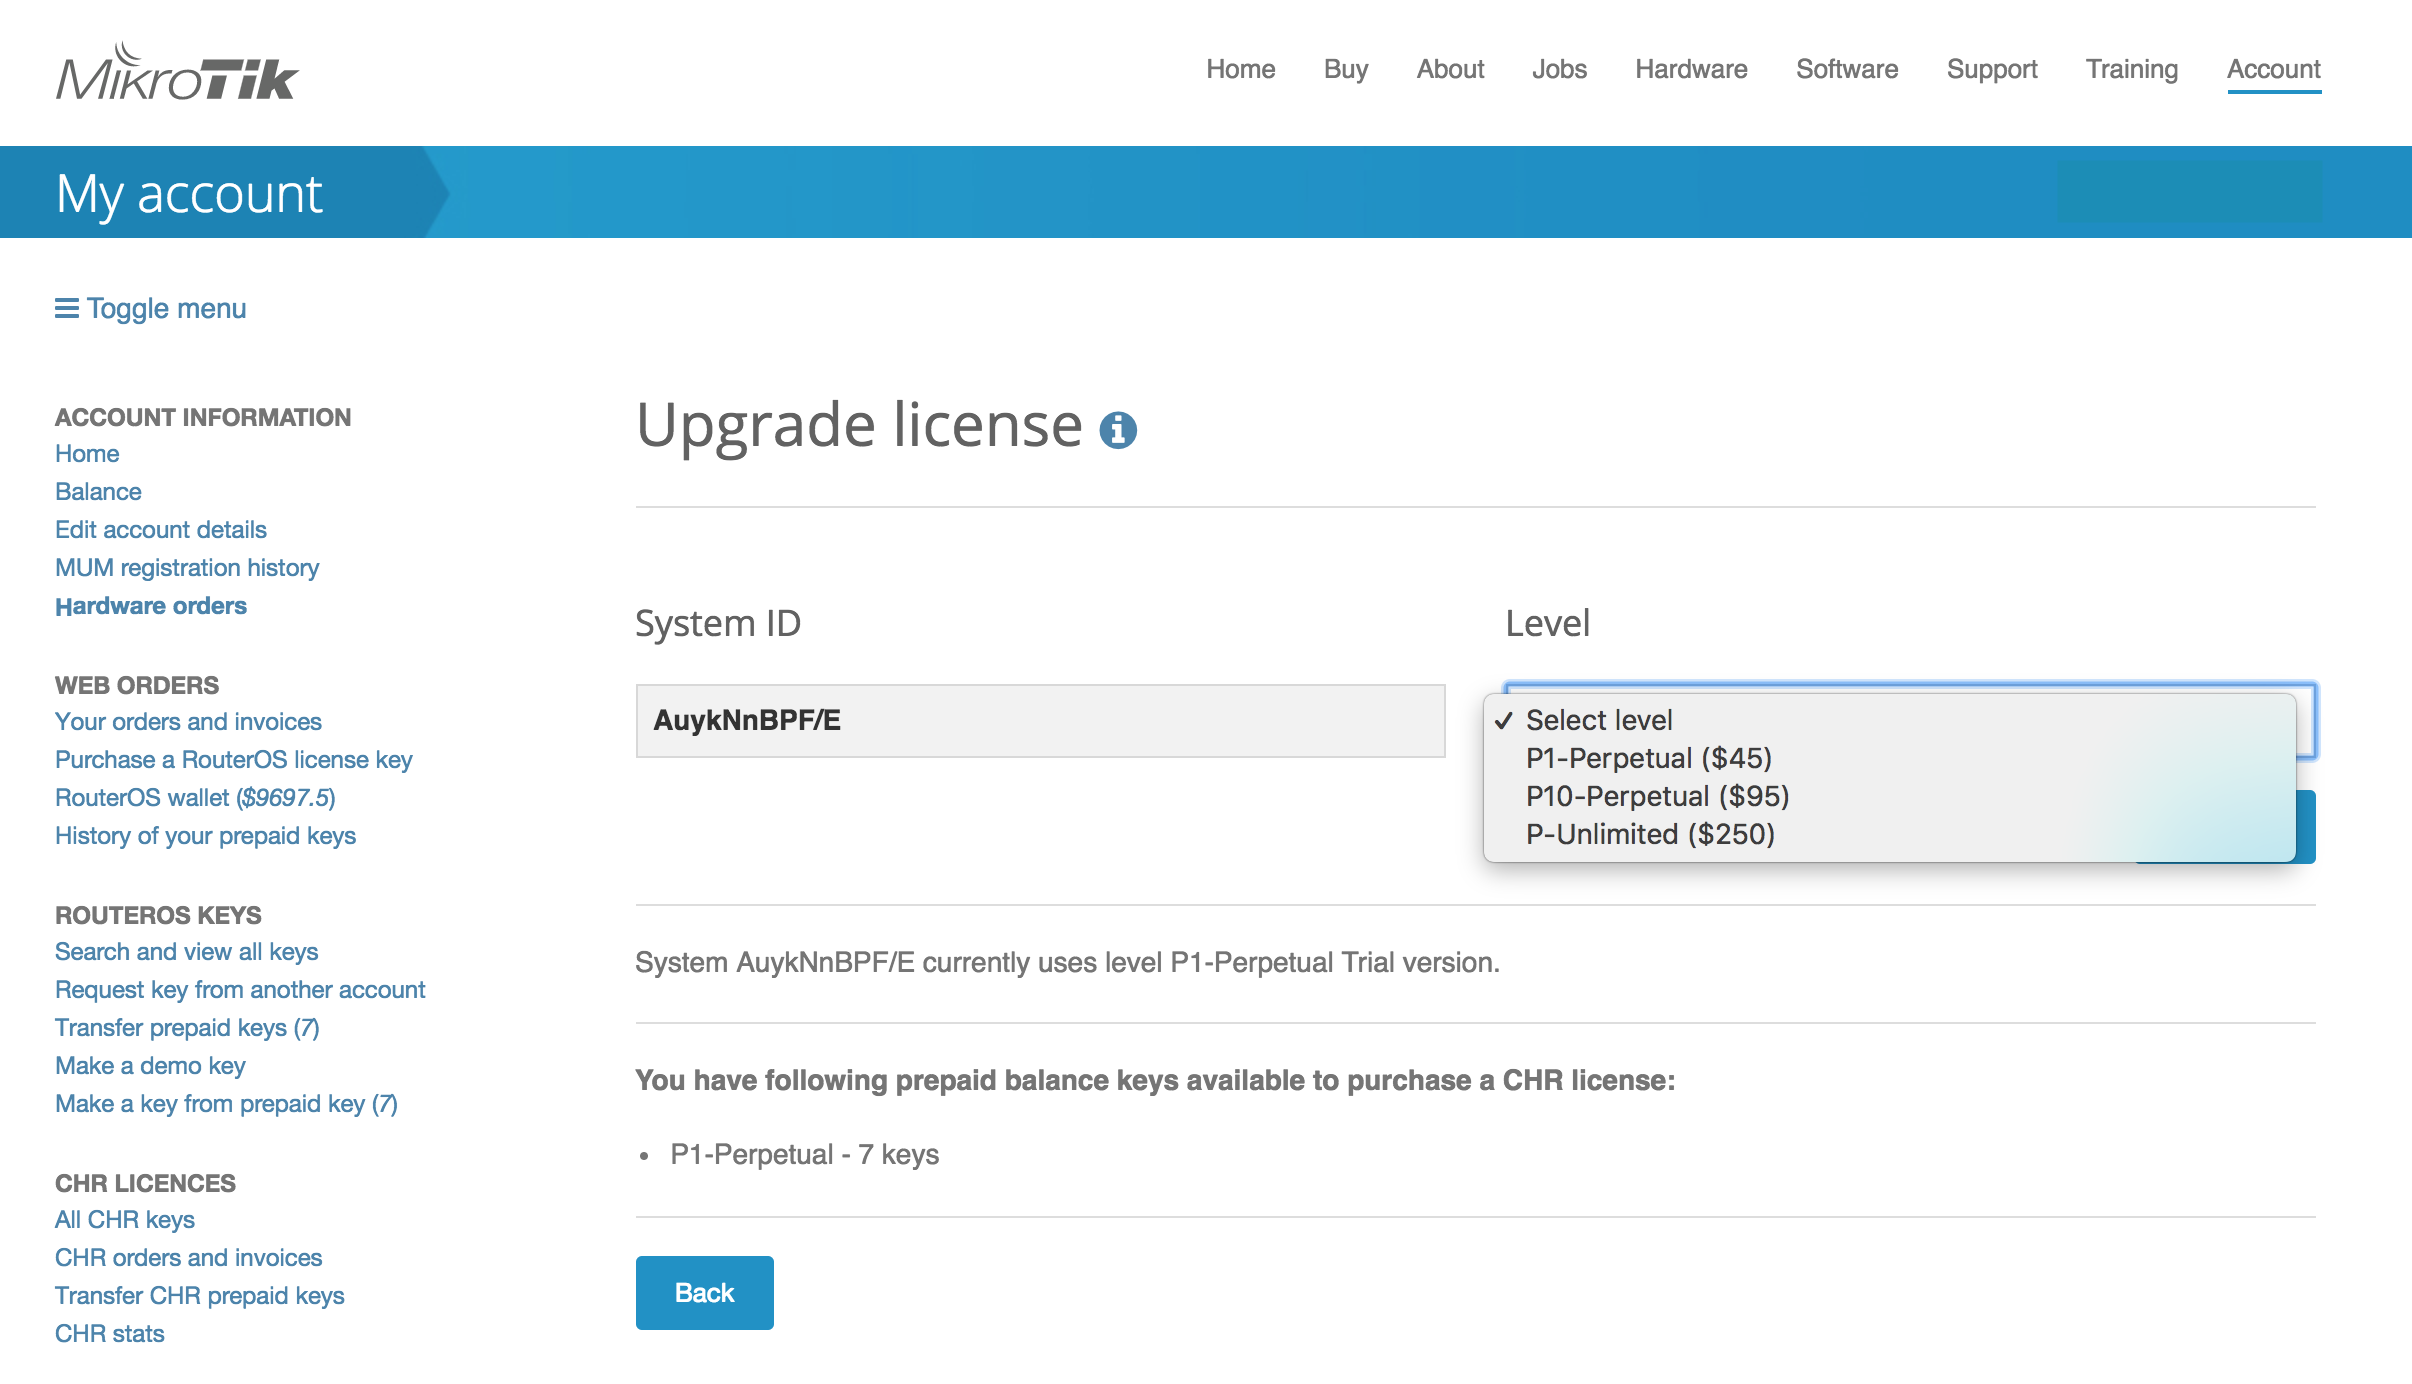
To upgrade from a Trial to a Paid license click 'Upgrade', choose the desired license level (it can be different than the level of the trial license) and click 'Upgrade key':
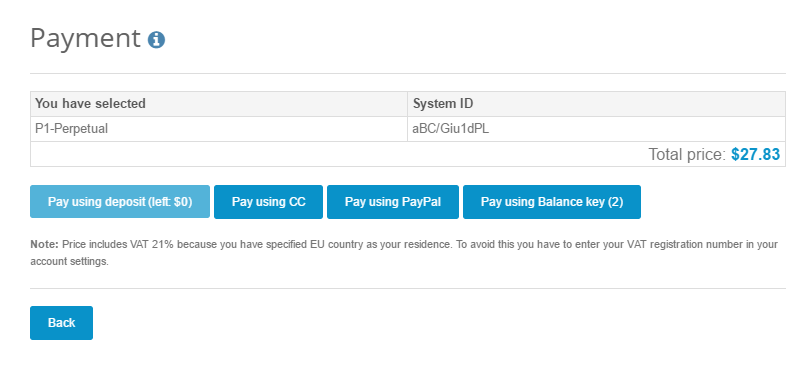
Choose the payment method:
It is possible to pay using account balance (deposit), credit card (CC), PayPal or using Balance (prepaid) key (if you have any).
License Update
In '/system license' menu router will indicate the time next-renewal-at when it will attempt to contact server located on licence.mikrotik.com. Communication attempts will be performed once an hour after the date on next-renewal-at and will not cease until the server responds with an error. If deadline-at date is reached without successfully contacting the account server, the router will consider that license has expired and will disallow further software updates. However, router will continue to work with the same license tier as before.
Troubleshooting
Running on VMware ESXi
Changing MTU
VMware ESXi supports MTU of up to 9000 bytes. To get the benefit of that, you have to adjust your ESXi installation to allow a higher MTU. Virtual Ethernet interface added after the MTU change will be properly allowed by the ESXi server to pass jumbo frames. Interfaces added prior to MTU change on the ESXi server will be barred by the ESXi server (it will still report old MTU as maximum possible size). If you have this, you have to re-add interfaces to the virtual guests.
Example. There are 2 interfaces added to the ESXi guest, auto-detected MTU on the interfaces show MTU size as it was at the time when the interface was added:
[admin@chr-vm] > interface ethernet print
Flags: X - disabled, R - running, S - slave
 #    NAME           MTU MAC-ADDRESS       ARP
 0 R  ether1        9000 00:0C:29:35:37:5C enabled
 1 R  ether2        1500 00:0C:29:35:37:66 enabled
Packets not passing from guests
The problem: after configuring a software interface (VLAN, EoIP, bridge, etc.) on the guest CHR it stops passing data to the outside world beyond the router.
The solution: check your VMS (Virtualization Management System) security settings, if other MAC addresses allowed to pass if packets with VLAN tags allowed to pass through. Adjust the security settings according to your needs like allowing MAC spoofing or certain MAC address range. For VLAN interfaces, it is usually possible to define allowed VLAN tags or VLAN tag range.
[ Top | Back to Content ]


