Manual:CRS3xx series switches: Difference between revisions
| Line 361: | Line 361: | ||
add bridge=bridge interface=ether4 hw=yes | add bridge=bridge interface=ether4 hw=yes | ||
</pre> | </pre> | ||
{{ Note | Don't add interfaces to a bridge that are already in a bond, RouterOS will not allow you to add an interface that is already a slave to a bridge as there is no need to do it since a bonding interface already contains the slave interfaces. }} | |||
Make sure that the bonding interface is hardware offloaded by checking the "H" flag: | Make sure that the bonding interface is hardware offloaded by checking the "H" flag: | ||
Revision as of 13:03, 5 March 2018
Summary
The Cloud Router Switch series are highly integrated switches with high performance ARM CPU and feature-rich packet processor. The CRS switches can be designed into various Ethernet applications including unmanaged switch, Layer 2 managed switch, carrier switch and wired unified packet processing.
Features
| Features | Description |
|---|---|
| Forwarding |
|
| Mirroring |
|
| VLAN |
|
| Bonding |
|
| Quality of Service (QoS) |
|
| Access Control List |
|
Models
This table clarifies main differences between Cloud Router Switch models.
| Model | Switch Chip | CPU | Cores | Wireless | SFP+ port | Access Control List | Jumbo Frame (Bytes) |
| CRS326-24G-2S+ | Marvell-98DX3236 | 800MHz | 1 | - | + | + | 10218 |
| CRS317-1G-16S+ | Marvell-98DX8216 | 800MHz | 2 | - | + | + | 10218 |
Abbreviations
- FDB - Forwarding Database
- MDB - Multicast Database
- SVL - Shared VLAN Learning
- IVL - Independent VLAN Learning
- PVID - Port VLAN ID
- ACL - Access Control List
Port Switching
Since v6.41 bridges will handle all Layer2 forwarding and the use of switch chip (hw-offload) will automatically turn on if appropriate conditions are met.
The rest of RouterOS Switch features remain untouched in usual menus.
By default all newly created bridge ports have hw=yes option and it allows enabling of hw-offload when possible. If such functionality is not required, it can be disabled by hw=no on bridge port to have completely software operated bridging.

Note: Downgrading to previous RouterOS versions will not restore master-port configuration. The bridge with no hw-offload will appear instead and master-port configuration will have to be redone from the beginning.
Example
Use the command lines below to create a bridge and add ports to it. On CRS3xx using other bridge protocol modes will also enable hardware offloading.
/interface bridge
add name=bridge1 igmp-snooping=no protocol-mode=none
/interface bridge port
add bridge=bridge1 interface=ether2
add bridge=bridge1 interface=ether3
add bridge=bridge1 interface=ether4
add bridge=bridge1 interface=ether5
Make sure that hardware offloading is enabled. If H flag is available next to the desired interface, then hardware offloading is active on that port. If hardware offloading flag is not shown, then make sure you haven't enabled features that disable hardware offloading.

Note: Currently it is possible to create only one bridge with hardware offloading on CRS3xx series devices. Use the hw parameter to select which bridge will use hardware offloading.
[admin@MikroTik] > /interface bridge port print
Flags: X - disabled, I - inactive, D - dynamic, H - hw-offload
 #     INTERFACE              BRIDGE              HW  PVID PRIORITY  PATH-COST INTERNAL-PATH-COST    HORIZON
 0   H ether2                 bridge1             yes    1     0x80         10                 10       none
 1   H ether3                 bridge1             yes    1     0x80         10                 10       none
 2   H ether4                 bridge1             yes    1     0x80         10                 10       none
 3   H ether5                 bridge1             yes    1     0x80         10                 10       none

Note: On CRS3xx series switches bridge STP/RSTP/MSTP, IGMP Snooping and VLAN filtering settings don't affect hardware offloading, bonding on the other hand disables hardware offloading
Host Table
Sub-menu: /interface bridge host
| Property | Description |
|---|---|
| age (read-only: time) | The time since the last packet was received from the host |
| bridge (read-only: name) | The bridge the entry belongs to |
| external-fdb (read-only: flag) | Whether the host was learned using wireless registration table |
| local (read-only: flag) | Whether the host entry is of the bridge itself (that way all local interfaces are shown) |
| mac-address (read-only: MAC address) | Host's MAC address |
| on-interface (read-only: name) | Which of the bridged interfaces the host is connected to |
Example
- Use this command to get the active host table:
[admin@MikroTik] > /interface bridge host print
Flags: L - local, E - external-fdb
  BRIDGE           MAC-ADDRESS       ON-INTERFACE          AGE
  bridge1          00:00:00:00:00:01 ether2                3s
  bridge1          00:01:29:FF:1D:CC ether2                0s
L bridge1          00:0C:42:52:2E:CF ether2                0s
  bridge1          00:0C:42:52:2E:D0 ether2                3s
  bridge1          00:0C:42:5C:A5:AE ether2                0s
VLAN
Since RouterOS v6.41 bridges provides VLAN aware Layer2 forwarding and VLAN tag modifications within the bridge. This set of features makes bridge operation more like a traditional Ethernet switch and allows to overcome Spanning Tree compatibilty issues compared to configuration when tunnel-like VLAN interfaces are bridged. Bridge VLAN Filtering configuration is highly recommended to comply with STP (802.1D), RSTP (802.1w) standards and is mandatory to enable MSTP (802.1s) support in RouterOS.
VLAN Filtering
The main VLAN setting is vlan-filtering which globally controls vlan-awareness and VLAN tag processing in the bridge. If vlan-filtering=no, bridge ignores VLAN tags, works in a shared-VLAN-learning (SVL) mode and cannot modify VLAN tags of packets. Turning on vlan-filtering enables all bridge VLAN related functionality and independent-VLAN-learning (IVL) mode. Besides joining the ports for Layer2 forwarding, bridge itself is also an interface therefore it has Port VLAN ID (pvid).
Sub-menu: /interface bridge
| Property | Description |
|---|---|
| vlan-filtering (yes | no; Default: no) | Globally enables or disables VLAN functionality for bridge. |
| pvid (1..4094; Default: 1) | Port VLAN ID (pvid) specifies which VLAN the untagged ingress traffic is assigned to. It applies e.g. to frames sent from bridge IP and destined to a bridge port. |
Sub-menu: /interface bridge port
| Property | Description |
|---|---|
| frame-types (admit-all | admit-only-untagged-and-priority-tagged | admit-only-vlan-tagged; Default: admit-all) | Specifies allowed ingress frame types on a bridge port. |
| ingress-filtering (yes | no; Default: no) | Enables or disables filtering which looks for an ingress port match in the Bridge VLAN table. |
| pvid (1..4094; Default: 1) | Port VLAN ID (pvid) specifies which VLAN the untagged ingress traffic is assigned to. |
VLAN Table
Bridge VLAN table represents per-VLAN port mapping with an egress VLAN tag action.
tagged ports send out frames with a learned VLAN ID tag.
untagged ports remove VLAN tag before sending out frames if the learned VLAN ID matches the port pvid.
Sub-menu: /interface bridge vlan
| Property | Description |
|---|---|
| bridge (name) | The bridge interface which the respective VLAN entry is intended for. |
| disabled (yes | no; Default: no) | Enables or disables Bridge VLAN entry. |
| tagged (interfaces; Default: none) | Interface list with a VLAN tag adding action in egress. This setting accepts comma separated values. E.g. tagged=ether1,ether2. |
| untagged (interfaces; Default: none) | Interface list with a VLAN tag removing action in egress. This setting accepts comma separated values. E.g. tagged=ether3,ether4. |
| vlan-ids (1..4094) | The list of VLAN IDs for certain port configuration. This setting accepts VLAN ID range as well as comma separated values. E.g. vlan-ids=100-115,120,122,128-130. |
Setup examples
Port Based VLAN
- The configuration for CRS3xx switches is described here: Port Based VLAN
MAC Based VLAN


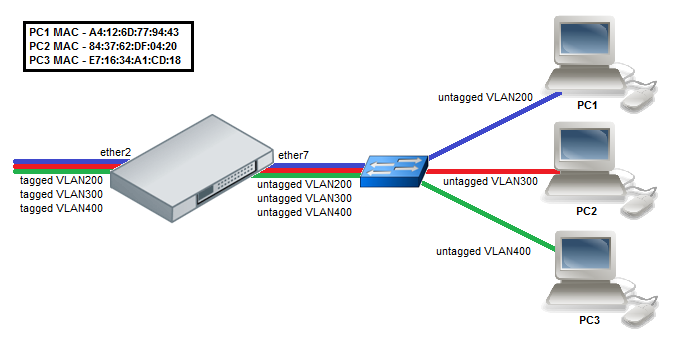
Note: The CRS3xx Switch Rule table is used for MAC Based VLAN functionality, it supports up to 128 entries.
- Enable switching on ports by creating a bridge with enabled hw-offloading.
/interface bridge
add name=bridge1 vlan-filtering=yes
/interface bridge port
add bridge=bridge1 interface=ether2 hw=yes
add bridge=bridge1 interface=ether7 hw=yes
- Add VLANs in the Bridge VLAN table and specify ports.
/interface bridge vlan
add bridge=bridge1 tagged=ether2 untagged=ether7 vlan-ids=200,300,400
- Add Switch rules which assign VLAN id based on MAC address.
/interface ethernet switch rule
add switch=switch1 ports=ether7 src-mac-address=A4:12:6D:77:94:43/FF:FF:FF:FF:FF:FF new-vlan-id=200
add switch=switch1 ports=ether7 src-mac-address=84:37:62:DF:04:20/FF:FF:FF:FF:FF:FF new-vlan-id=300
add switch=switch1 ports=ether7 src-mac-address=E7:16:34:A1:CD:18/FF:FF:FF:FF:FF:FF new-vlan-id=400
(R/M)STP
Network loops may emerge (intentionally or not) in complex topologies. Without any special treatment, loops would prevent network from functioning normally, as they would lead to avalanche-like packet multiplication. Each bridge runs an algorithm which calculates how the loop can be prevented. STP and RSTP allows bridges to communicate with each other, so they can negotiate a loop free topology. All other alternative connections that would otherwise form loops, are put to standby, so that should the main connection fail, another connection could take its place. This algorithm exchanges configuration messages (BPDU - Bridge Protocol Data Unit) periodically, so that all bridges are updated with the newest information about changes in network topology. (R/M)STP selects a root bridge which is responsible for network reconfiguration, such as blocking and opening ports on other bridges. The root bridge is the bridge with the lowest bridge ID.
As of RouterOS v6.41 all CRS3xx series switches support (R/M)STP bridge protocol mode and hardware offloading simultaneously, meaning that it possible to use the switch chip's built-in VLAN filtering function in conjunction with bridge's Spanning Tree Protocol features and forward packets at wire-speed. There are a lot of considerations that should be made when designing a STP enabled network, more detailed case studies can be found in the Spanning Tree Protocol section.
Sub-menu: /interface bridge
| Property | Description |
|---|---|
| protocol-mode (mstp | none | rstp | stp; Default: rstp) |
|
Bonding
As of RouterOS v6.42rc23 all CRS3xx series switches support hardware offloading with bonding interfaces. Only 802.3ad and balance-xor bonding modes are hardware offloaded, other bonding modes will use the CPU's resources. You can find more information about the bonding interfaces in the Bonding Interface section. If 802.3ad mode is used, then LACP (Link Aggregation Control Protocol) is supported.
To create a hardware offloaded bonding interface, you must create a bonding interface with a supported bonding mode:
/interface bonding
add mode=802.3ad name=bond1 slaves=ether1,ether2
This interface can be added to a bridge alongside with other interfaces:
/interface bridge
add name=bridge
/interface bridge port
add bridge=bridge interface=bond1 hw=yes
add bridge=bridge interface=ether3 hw=yes
add bridge=bridge interface=ether4 hw=yes

Note: Don't add interfaces to a bridge that are already in a bond, RouterOS will not allow you to add an interface that is already a slave to a bridge as there is no need to do it since a bonding interface already contains the slave interfaces.
Make sure that the bonding interface is hardware offloaded by checking the "H" flag:
/interface bridge port print
Flags: X - disabled, I - inactive, D - dynamic, H - hw-offload
 #     INTERFACE                                 BRIDGE                                 HW
 0   H bond1                                     bridge                                 yes
 1   H ether3                                    bridge                                 yes
 2   H ether4                                    bridge                                 yes

Note: The built-in switch chip will always use Layer2+Layer3+Layer4 for transmit hash policy, setting it manually will have no effect.
IGMP Snooping
IGMP Snooping which controls multicast streams and prevents multicast flooding is implemented in RouterOS starting from version 6.41. It's settings are placed in bridge menu and it works independently in every bridge interface. Software driven implementation works on all devices with RouterOS but CRS1xx/2xx/3xx series switches also support IGMP Snooping with hardware offloading.
- Use this command to enable IGMP Snooping on a bridge interface:
/interface bridge set bridge1 igmp-snooping=yes
- Use this command to get current Multicast Database entries:
[admin@MikroTik] > /interface bridge mdb print
BRIDGE                   VID GROUP                                              PORTS
bridge1                  200 229.1.1.2                                          ether3
                                                                                ether2
                                                                                ether1
bridge1                  300 231.1.3.3                                          ether4
                                                                                ether3
                                                                                ether2
bridge1                  400 229.10.10.4                                        ether4
                                                                                ether3
bridge1                  500 234.5.1.5                                          ether5
                                                                                ether1
Global Switch Settings
This sections holds general information about the switch chip built-in into the device and allows to specify port mirroring options.
Sub-menu: /interface ethernet switch
To view the current switch chip for the device, use this command:
[admin@MikroTik] /interface ethernet switch> print
Flags: I - invalid
 #   NAME                              TYPE             MIRROR-SOURCE                             MIRROR-TARGET
 0   switch1                           Marvell-98DX3236 none                                      none
To change the switch chip's name, use this command:
/interface ethernet switch set switch1 name=switch_chip
Port Mirroring
Port mirroring lets switch 'sniff' all traffic that is going in and out of one port (mirror-source) and send a copy of those packets out of some other port (mirror-target). This feature can be used to easily set up a 'tap' device that receives all traffic that goes in/out of some specific port. Note that mirror-source and mirror-target ports have to belong to same switch. (See which port belong to which switch in /interface ethernet menu). Also mirror-target can have a special 'cpu' value, which means that 'sniffed' packets should be sent out of switch chips cpu port. Port mirroring happens independently of switching groups that have or have not been set up.
Use this command to set a port mirror from ether2 to ether3:
/interface ethernet switch
set switch1 mirror-source=ether2 mirror-target=ether3
Quality of Service
It is possible to limit ingress and egress bandwidth per port using the /interface ethernet switch port menu.
Sub-menu: /interface ethernet switch port
| Property | Description |
|---|---|
| egress-rate (bps; Default: unlimited) | Specifies port egress rate in bps, limited by using traffic shaper. |
| ingress-rate (bps; Default: unlimited) | Specifies port ingress rate in bps, limited by using traffic policer. |
- For example, to limit ingress and egress traffic on ether1 use these commands:
/interface ethernet switch port
set ether1 ingress-rate=10M egress-rate=5M
Traffic Storm Control
Since RouterOS 6.42rc18 it is possible to enable traffic storm control on CRS3xx series devices. It is possible to limit broadcast, unknown multicast and unknown unicast traffic. These settings should be applied to ingress ports, the egress traffic will be limited.

Note: The storm control parameter is specified in percentage (%) of the link speed. If your link speed is 1Gbps, then specifying storm-rate as 10 will allow only 100Mbps of broadcast, unknown multicast and/or unknown unicast traffic to be forwarded.
Sub-menu: /interface ethernet switch port
| Property | Description |
|---|---|
| limit-broadcasts (yes | no; Default: yes) | Limit broadcast traffic on switch port. |
| limit-unknown-multicasts (yes | no; Default: no) | Limit unknown multicast traffic on switch port. |
| limit-unknown-unicasts (yes | no; Default: no) | Limit unknown unicast traffic on switch port. |
| storm-rate (integer 0..100; Default: 100) | Amount of broadcast, unknown multicast and/or unknown unicast traffic is limited to in percentage of the link speed. |

Warning: Devices with Marvell-98DX3236 switch chip cannot distinguish unknown multicast traffic from all multicast traffic. For example, CRS326-24G-2S+ will limit all multicast traffic when limit-unknown-multicasts and storm-rate is used. For other devices, for example, CRS317-1G-16S+ the limit-unknown-multicasts parameter will limit only unknown multicast traffic (addresses that are not present in /interface bridge mdb
- For example, to limit 1% (10Mbps) of broadcast and unknown unicast traffic on ether1 (1Gbps), use the following commands:
/interface ethernet switch port
set ether1 storm-rate=1 limit-broadcasts=yes limit-unknown-unicasts=yes
Switch Rules (ACL)
Access Control List contains of ingress policy and egress policy engines and allows to configure up to 128 policy rules (limited by RouterOS). It is advanced tool for wire-speed packet filtering, forwarding and modifying based on Layer2, Layer3 and Layer4 protocol header field conditions.
Sub-menu: /interface ethernet switch rule
| Property | Description |
|---|---|
| copy-to-cpu (no | yes; Default: no) | Clones the matching packet and sends it to the CPU. |
| disabled (yes | no; Default: no) | Enables or disables ACL entry. |
| dscp (0..63) | Matching DSCP field of the packet. |
| dst-address (IP address/Mask) | Matching destination IP address and mask. |
| dst-address6 (IPv6 address/Mask) | Matching destination IPv6 address and mask. |
| dst-mac-address (MAC address/Mask) | Matching destination MAC address and mask. |
| dst-port (0..65535) | Matching destination protocol port number. |
| flow-label (0..1048575) | Matching IPv6 flow label. |
| mac-protocol (802.2 | arp | homeplug-av | ip | ipv6 | ipx | lldp | loop-protect | mpls-multicast | mpls-unicast | packing-compr | packing-simple | pppoe | pppoe-discovery | rarp | service-vlan | vlan | or 0..65535 | or 0x0000-0xffff) | Matching particular MAC protocol specified by protocol name or number |
| mirror (no | yes) | Clones the matching packet and sends it to the mirror-target port. |
| new-dst-ports (ports) | Changes the destination port as specified. An empty setting will drop the packet. A specified port will redirect the packet to it. When the parameter is not used, the packet will be accepted. Multiple "new-dst-ports" are not supported on CRS3xx series switches. |
| new-vlan-id (0..4095) | Changes the VLAN ID to the specified value. Requires vlan-filtering=yes. |
| new-vlan-priority (0..7) | Changes the VLAN priority tag. Requires vlan-filtering=yes. |
| ports (ports) | Matching ports on which will the rule apply on received traffic. |
| protocol (dccp | ddp | egp | encap | etherip | ggp | gre | hmp | icmp | icmpv6 | idpr-cmtp | igmp | ipencap | ipip | ipsec-ah | ipsec-esp | ipv6 | ipv6-frag | ipv6-nonxt | ipv6-opts | ipv6-route | iso-tp4 | l2tp | ospf | pim | pup | rdp | rspf | rsvp | sctp | st | tcp | udp | udp-lite | vmtp | vrrp | xns-idp | xtp | or 0..255) | Matching particular IP protocol specified by protocol name or number. |
| redirect-to-cpu (no | yes) | Changes the destination port of a matching packet to the CPU. |
| src-address (IP address/Mask) | Matching source IP address and mask. |
| src-address6 (IPv6 address/Mask) | Matching source IPv6 address and mask. |
| src-mac-address (MAC address/Mask) | Matching source MAC address and mask. |
| src-port (0..65535) | Matching source protocol port number. |
| switch (switch group) | Matching switch group on which will the rule apply. |
| traffic-class (0..255) | Matching IPv6 traffic class. |
| vlan-id (0..4095) | Matching VLAN ID. Requires vlan-filtering=yes. |
| vlan-header (not-present | present) | Matching VLAN header, whether the VLAN header is present or not. |
| vlan-priority (0..7) | Matching VLAN priority. |
Action parameters:
- copy-to-cpu
- redirect-to-cpu
- mirror
- new-dst-ports (can be used to drop packets)
- new-vlan-id
- new-vlan-priority
- rate
Conditional parameters:
- Layer2 conditions:
- dst-mac-address
- mac-protocol
- src-mac-address
- vlan-id
- vlan-header
- vlan-priority
- Layer3 conditions:
- dscp
- protocol
- IPv4 conditions:
- dst-address
- src-address
- IPv6 conditions:
- dst-address6
- flow-label
- src-address6
- traffic-class
- Layer4 conditions:
- dst-port
- src-port

Note: For VLAN related matchers or VLAN related action parameters to work, you need to enable vlan-filtering on the bridge interface and make sure that hardware offloading is enabled on those ports, otherwise these parameters will not have any effect.
Dual Boot
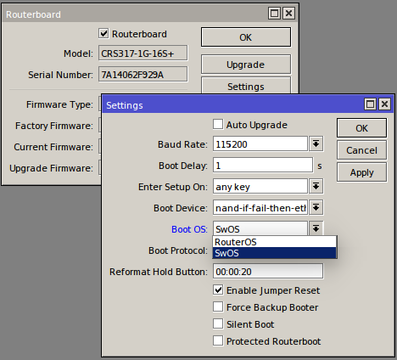
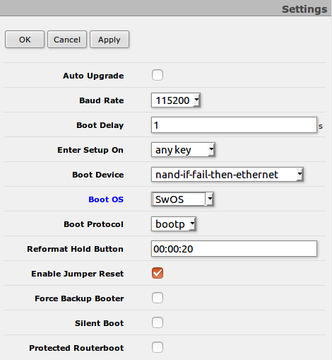
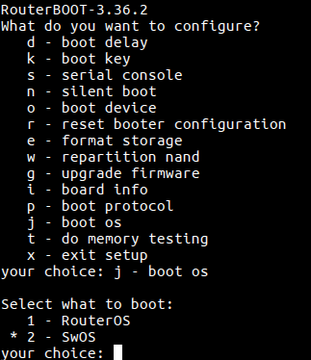
“Dual boot” feature allows you to choose which operating system you prefer to use, RouterOS or SwOS. Device operating system could be changed using:
- Serial Terminal (/system routerboard settings set boot-os=swos)
- Winbox
- Webfig
- Serial Console
 |
 |
 |
More details about SwOS are described here: SwOS manual
See also
[ Top | Back to Content ]
