Manual:Wireless EAP-TLS using RouterOS with FreeRADIUS: Difference between revisions
Created page with "{{Versions| v6.41 +}} __TOC__ =Summary= Password-less (certificate based or private/public key based) authentication is great for security, though setting up is not always..." |
|||
| Line 12: | Line 12: | ||
In this guide we are going to assume the following: | In this guide we are going to assume the following: | ||
10.0.0.1 - our main gateway/Router-CA (going to be used to generate certificates, can be the same device as the Wireless AP) | *10.0.0.1 - our main gateway/Router-CA (going to be used to generate certificates, can be the same device as the Wireless AP) | ||
10.0.0.2 - our FreeRADIUS Server | *10.0.0.2 - our FreeRADIUS Server | ||
10.0.0.3 - our Wireless AP | *10.0.0.3 - our Wireless AP | ||
==Router-CA== | ==Router-CA== | ||
Revision as of 19:02, 26 October 2018
Summary
Password-less (certificate based or private/public key based) authentication is great for security, though setting up is not always straight forward. This guide will show you how to set up WPA/WPA2 EAP-TLS authentication using RouterOS and FreeRADIUS. In this example we are going to use Debian and FreeRADIUS to process RADIUS requests, RouterOS as a RADIUS Client, RouterOS to generate required server/client certificates and RouterOS as a Wireless Client to connect to a WPA/WPA2 EAP-TLS secured network.

Configuration
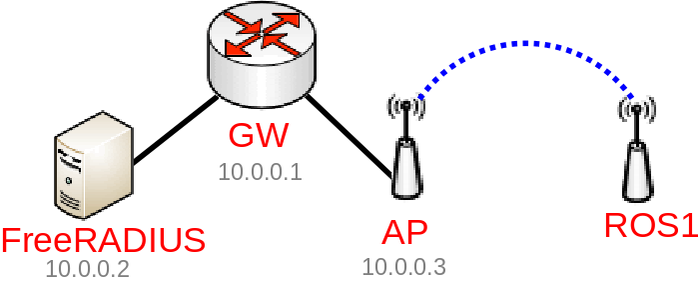
In this guide we are going to assume the following:
- 10.0.0.1 - our main gateway/Router-CA (going to be used to generate certificates, can be the same device as the Wireless AP)
- 10.0.0.2 - our FreeRADIUS Server
- 10.0.0.3 - our Wireless AP
Router-CA
In this example we are going to use a RouterOS device to generate required certificates, it is not required, but RouterOS is very convenient to generate certificates, use these commands on your Router-CA:
/certificate add name=LocalCA common-name=10.0.0.1 locality=mt.lv organization=MikroTik unit=testing subject-alt-name=email:support@mikrotik.com key-size=4096 days-valid=3650 key-usage=crl-sign,key-cert-sign
/certificate add name=FreeRADIUS_Server common-name=10.0.0.2 locality=mt.lv organization=MikroTik unit=FreeRADIUS subject-alt-name=email:support@mikrotik.com key-size=4096 days-valid=3650 key-usage=digital-signature,key-encipherment,tls-server
/certificate add name=FreeRADIUS_Client common-name=ROS1 locality=mt.lv organization=MikroTik unit=FreeRADIUS subject-alt-name=email:support@mikrotik.com key-size=4096 days-valid=3650 key-usage=tls-client
/certificate sign LocalCA ca-crl-host=10.0.0.1 name=LocalCA
/certificate sign FreeRADIUS_Server ca=LocalCA name=FreeRADIUS_Server
/certificate sign FreeRADIUS_Client ca=LocalCA name=FreeRADIUS_Client
/certificate set FreeRADIUS_Server,FreeRADIUS_Client trusted=yes
/certificate export-certificate FreeRADIUS_Server export-passphrase=server_certificate_password_123
/certificate export-certificate FreeRADIUS_Client export-passphrase=client_certificate_password_123
/certificate export-certificate LocalCA

Note: Be sure to set the correct common-name for the FreeRADIUS Client device, this must match the supplicant-identity.
Download the following files and upload them to the appropriate destination:
- cert_export_FreeRADIUS_Server.crt -> FreeRADIUS Server: /etc/ssl/FreeRADIUS/
- cert_export_FreeRADIUS_Server.key -> FreeRADIUS Server: /etc/ssl/FreeRADIUS/
- cert_export_LocalCA.crt -> FreeRADIUS Server: /etc/ssl/FreeRADIUS/
- cert_export_LocalCA.crt -> Wireless Client: /
- cert_export_FreeRADIUS_Client.crt -> Wireless Client: /
- cert_export_FreeRADIUS_Client.key -> Wireless Client: /
FreeRADIUS Server
Here we are assuming you have already set up FreeRADIUS Server on your Debian box, below you can find the configuration file for /etc/freeradius/3.0/sites-enabled/default:
server {
    listen {
        type = auth
        port = 1812
        ipaddr = 10.0.0.2
    }
    authorize {
        preprocess
        suffix
        filter_username
        eap {
                ok = return
        }
        expiration
        logintime
    }
    preacct {
        preprocess
        acct_unique
        suffix
    }
    accounting {
        detail
        radutmp
        attr_filter.accounting_response
    }
    session {
        radutmp
    }
    post-auth {
        remove_reply_message_if_eap
        Post-Auth-Type REJECT {
                attr_filter.access_reject
                eap
                remove_reply_message_if_eap

        }
    }
}

Note: By default the inner-tunnel site is enabled, you might want to disable it since it can cause security issues.
Configuration for /etc/freeradius/3.0/mods-enabled/eap:
eap {
        default_eap_type = tls
        timer_expire     = 60
        ignore_unknown_eap_types = no
        cisco_accounting_username_bug = no
        max_sessions = ${max_requests}
        tls-config tls-common {
                private_key_password = server_certificate_password_123
                private_key_file = /etc/ssl/FreeRADIUS/cert_export_FreeRADIUS_Serv$
                certificate_file = /etc/ssl/FreeRADIUS/cert_export_FreeRADIUS_Serv$
                ca_file = /etc/ssl/FreeRADIUS/cert_export_LocalCA.crt
                dh_file = ${certdir}/dh
                random_file = /dev/urandom
                ca_path = ${cadir}
                cipher_list = "DEFAULT"
                cipher_server_preference = no
                ecdh_curve = "prime256v1"
                cache {
                        enable = no
                        lifetime = 24 # hours
                }
                ocsp {
                        enable = no
                        override_cert_url = yes
                        url = "http://127.0.0.1/ocsp/"
                }
        }
        tls {
                tls = tls-common
        }
}
Don't forgot to allow connections from our RAIDUS Client in /etc/freeradius/3.0/clients.conf:
client private-network-1 {
        ipaddr          = 10.0.0.0/24
        secret          = very_radius_secret_123
}
Restart the service:
systemctl restart freeradius.service
Wireless AP
Configure the RADIUS Client:
/radius
add address=10.0.0.2 secret=very_radius_secret_123 service=wireless
Setup the Wireless interface to use WPA2 EAP-TLS:
/interface wireless security-profiles
add authentication-types=wpa2-eap mode=dynamic-keys name=eap_tls_profile
/interface wireless
set wlan1 disabled=no mode=ap-bridge security-profile=eap_tls_profile ssid=WiFi
Wireless Client
Import the certificate files:
/certificate import file-name=cert_export_FreeRADIUS_Client.crt
/certificate import file-name=cert_export_FreeRADIUS_Client.key
Setup up the Wireless interface:
/interface wireless security-profiles
add authentication-types=wpa2-eap eap-methods=eap-tls mode=dynamic-keys name=eap_tls_profile supplicant-identity=ROS1 tls-certificate=cert_export_FreeRADIUS_Client.crt_0 tls-mode=verify-certificate
/interface wireless
set wlan1 disabled=no security-profile=eap_tls_profile ssid=WiFi
That is it!
