Manual:Wireless EAP-TLS using RouterOS with FreeRADIUS
Summary
Password-less (certificate based or private/public key based) authentication is great for security, though setting up is not always straight forward. This guide will show you how to set up WPA/WPA2 EAP-TLS authentication using RouterOS and FreeRADIUS. In this example we are going to use Debian and FreeRADIUS to process RADIUS requests, RouterOS as a RADIUS Client, RouterOS to generate required server/client certificates and RouterOS as a Wireless Client to connect to a WPA/WPA2 EAP-TLS secured network.

Configuration
In this guide we are going to assume the following:
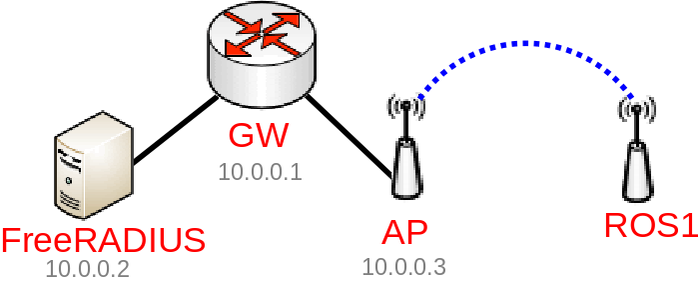
- 10.0.0.1 - our main gateway/Router-CA (going to be used to generate certificates, can be the same device as the Wireless AP)
- 10.0.0.2 - our FreeRADIUS Server
- 10.0.0.3 - our Wireless AP
Router-CA
In this example we are going to use a RouterOS device to generate required certificates, it is not required, but RouterOS is very convenient to generate certificates, use these commands on your Router-CA (this can be done on any RouterOS device, does not even need to be connected to the same network):
/certificate add name=LocalCA common-name=10.0.0.1 locality=mt.lv organization=MikroTik unit=testing subject-alt-name=email:support@mikrotik.com key-size=4096 days-valid=3650 key-usage=crl-sign,key-cert-sign
/certificate add name=FreeRADIUS_Server common-name=10.0.0.2 locality=mt.lv organization=MikroTik unit=FreeRADIUS subject-alt-name=email:support@mikrotik.com key-size=4096 days-valid=3650 key-usage=digital-signature,key-encipherment,tls-server
/certificate add name=FreeRADIUS_Client common-name=ROS1 locality=mt.lv organization=MikroTik unit=FreeRADIUS subject-alt-name=email:support@mikrotik.com key-size=4096 days-valid=3650 key-usage=tls-client
/certificate sign LocalCA ca-crl-host=10.0.0.1 name=LocalCA
/certificate sign FreeRADIUS_Server ca=LocalCA name=FreeRADIUS_Server
/certificate sign FreeRADIUS_Client ca=LocalCA name=FreeRADIUS_Client
/certificate set FreeRADIUS_Server,FreeRADIUS_Client trusted=yes
/certificate export-certificate FreeRADIUS_Server export-passphrase=server_certificate_password_123
/certificate export-certificate FreeRADIUS_Client export-passphrase=client_certificate_password_123
/certificate export-certificate LocalCA

Note: Be sure to set the correct common-name for the FreeRADIUS Client device, this must match the supplicant-identity.
Download the following files and upload them to the appropriate destination:
- cert_export_FreeRADIUS_Server.crt -> FreeRADIUS Server: /etc/ssl/FreeRADIUS/
- cert_export_FreeRADIUS_Server.key -> FreeRADIUS Server: /etc/ssl/FreeRADIUS/
- cert_export_LocalCA.crt -> FreeRADIUS Server: /etc/ssl/FreeRADIUS/
- cert_export_LocalCA.crt -> Wireless Client: /
- cert_export_FreeRADIUS_Client.crt -> Wireless Client: /
- cert_export_FreeRADIUS_Client.key -> Wireless Client: /
FreeRADIUS Server
Here we are assuming you have already set up FreeRADIUS Server on your Debian box, below you can find the configuration file for /etc/freeradius/3.0/sites-enabled/default:
server {
    listen {
        type = auth
        port = 1812
        ipaddr = 10.0.0.2
    }
    authorize {
        preprocess
        suffix
        filter_username
        eap {
                ok = return
        }
        expiration
        logintime
    }
    preacct {
        preprocess
        acct_unique
        suffix
    }
    accounting {
        detail
        radutmp
        attr_filter.accounting_response
    }
    session {
        radutmp
    }
    post-auth {
        remove_reply_message_if_eap
        Post-Auth-Type REJECT {
                attr_filter.access_reject
                eap
                remove_reply_message_if_eap

        }
    }
}

Note: By default the inner-tunnel site is enabled, you might want to disable it since it can cause security issues.
Configuration for /etc/freeradius/3.0/mods-enabled/eap:
eap {
        default_eap_type = tls
        timer_expire = 60
        ignore_unknown_eap_types = no
        cisco_accounting_username_bug = no
        max_sessions = ${max_requests}
        tls-config tls-common {
                private_key_password = testing123
                private_key_file = /etc/ssl/FreeRADIUS/cert_export_FreeRADIUS_Server.key
                certificate_file = /etc/ssl/FreeRADIUS/cert_export_FreeRADIUS_Server.crt
                ca_file = /etc/ssl/FreeRADIUS/cert_export_LocalCA.crt
                dh_file = ${certdir}/dh
                random_file = /dev/urandom
                ca_path = /etc/ssl/FreeRADIUS/
                cipher_list = "HIGH"
                ecdh_curve = "prime256v1"
                cipher_server_preference = yes
                verify {
                        tmpdir = /tmp/radiusd
                        client = "/usr/bin/openssl verify -CAfile ${..ca_file} %{TLS-Client-Cert-Filename}"
                }
        }
        tls {
                tls = tls-common
        }
}
Create the temporary directory for certificate verification and set proper permissions on it:
mkdir /tmp/radiusd/
chown freerad:freerad /tmp/radiusd
Don't forget to allow connections from our RAIDUS Client in /etc/freeradius/3.0/clients.conf:
client private-network-1 {
        ipaddr          = 10.0.0.0/24
        secret          = very_radius_secret_123
}
Restart the service:
systemctl restart freeradius.service

Warning: The configuration is only an example, even though you can use the exact configuration and your FreeRADIUS Server will work as intended for this guide, you should still make sure only allowed devices can use the FreeRADIUS Server and only allowed authentication protocols are specified. Some options can be removed, but are left here for debugging purposes. Some options match with the default values.
Wireless AP
Configure the RADIUS Client:
/radius
add address=10.0.0.2 secret=very_radius_secret_123 service=wireless
Setup the Wireless interface to use WPA2 EAP-TLS:
/interface wireless security-profiles
add authentication-types=wpa2-eap mode=dynamic-keys name=eap_tls_profile
/interface wireless
set wlan1 disabled=no mode=ap-bridge security-profile=eap_tls_profile ssid=WiFi
Wireless Client
Import the certificate files:
/certificate import file-name=cert_export_LocalCA.crt
/certificate import file-name=cert_export_FreeRADIUS_Client.crt
/certificate import file-name=cert_export_FreeRADIUS_Client.key
Setup up the Wireless interface:
/interface wireless security-profiles
add authentication-types=wpa2-eap eap-methods=eap-tls mode=dynamic-keys name=eap_tls_profile supplicant-identity=ROS1 tls-certificate=cert_export_FreeRADIUS_Client.crt_0 tls-mode=verify-certificate
/interface wireless
set wlan1 disabled=no security-profile=eap_tls_profile ssid=WiFi
The Wireless Client should now be authenticated. That is it!
