Manual:CHR Linode
Linode allows you to run virtual machines in the cloud. Standard images only include various generic Linux distributions, but it is also possible to run RouterOS CHR images with a little workaround, by going through the recovery boot mode in your linode system, and imaging your disk with the CHR .img file.
Linode disk and profile

- Create a new Linode with any settings
- Add new disk of any size above 128MB (type RAW)
- In the Linode "Rescue" tab, boot in Rescue mode. Make sure your newly created disk is selected to show up in Rescue mode
- In the remote access section, click "Lish via Browser", which should open a popup window with direct access to the Linode console
- Download the newest CHR raw disk image:
wget https://download2.mikrotik.com/routeros/6.44.3/chr-6.44.3.img.zip, the latest version is available from the download page - To make sure you write to the correct disk, type
fdisk -land find the disk that corresponds to the size you selected in step 2. - Issue the following (as a root)
unzip chr-6.44.3.img.zip | dd if=chr-6.44.3.img of=/dev/sda bs=1M iflag=fullblock - In Linode web dashboard click "Shutdown" to turn off the Linode and exit the Recovery mode
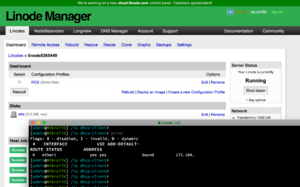
- In the Linode main Dashboard, create a new configuration profile, select the following:
- VM mode: paravirtualization
- kernel: direct disk
- Block device assignment: /dev/sda
Booting RouterOS
To boot RouterOS in the main dashboard, click the Boot button to start your RouterOS CHR. Caution! The public device will immediately be attacked by bots, guessing your password, since this is an unsecured public system.
You will have to wait some 20 seconds until the device obtains a DHCP address, then you can ssh from your PC to the RouterOS machine, using the public IP/DNS name that Linode shows in the Remote access section.
Then you can proceed to SSH into your system and set the most basic security settings, for example:
ssh linode12345.members.linode.com
/user set 0 name=yourname
/user set 0 password=newpassword
/ip service set 0,1,2,4,5,6,7 disabled=yes
/ip service set ssh port=2299
This will rename your admin user, set a password, disable all services except SSH and set a custom port.
You can now re-login with the new credentials
ssh linode12345.members.linode.com -l yourname -p 2299
Obtaining a RouterOS CHR license
The system has been booted in unlicensed mode, meaning it is limited to 1Mbit per interface. If this is of no importance, you may use it free of charge. If you wish to run a faster system, you need to obtain a license. To do that, start with a 30 day trial with this command:
/system license> renew account=loginname password=pass level=p1
You must provide your mikrotik.com account login here, and choose a license level to try. P1 gives you 1Gbit per interface and should be enough for most people. Also available are p10 (10Gbit) and p-unlimited (More than 10Gbit per interface).
After entering the above command, RouterOS will show the status as it fetches the license. If all is fine, it will show "status: done".
Type /system license print to verify that you now have a p1 license.

Note: It is important to understand that from RouterOS perspective all licenses are equal, trial or not. It will check the license validity every month, regardless if your license is trial or paid in your mikrotik.com account. Even a paid license will show Deadline date on this menu. This simply means that RouterOS will connect to mikrotik.com and verify if the paid license is still there, and hasn't been reassigned to another CHR. RouterOS doesn't show PAID status in this menu. Payments are done on mikrotik.com only.
Paying for trial
Once you have a running Trial P1 system, you are free to use it for unlimited period of time (the only limitation is that RouterOS will not allow upgrades after the trial ends). If you plan to pay for the the system, you must do it before your trial time runs out, otherwise a reinstall will be required. To pay for a trial, log into your mikrotik.com account and proceed to the CHR section on the left hand side menu. Your CHR system will be visible there, and you will be able to pay for the trial.

Note: CHR systems have no SoftID as physical RouterOS installations. Do not attempt to manually purchase a license key from the account or from our distributors. Licensing can only be done in the CHR Menu of your mikrotik.com account