Manual:Simple BGP Multihoming: Difference between revisions
| Line 81: | Line 81: | ||
</pre> | </pre> | ||
We also do not need any routes from both ISPs, because default route is used to force outgoing traffic through ISP1 and leave ISP2 as backup. | |||
<pre> | |||
/routing filter | |||
add chain=isp1-in action=discard | |||
add chain=isp2-in action=discard | |||
</pre> | |||
<pre> | |||
/ip route | |||
add gateway=192.168.1.1 check-gateway=ping | |||
add gateway=192.168.2.1 distance=30 check-gateway=ping | |||
</pre> | |||
Revision as of 07:22, 2 November 2010
Setup
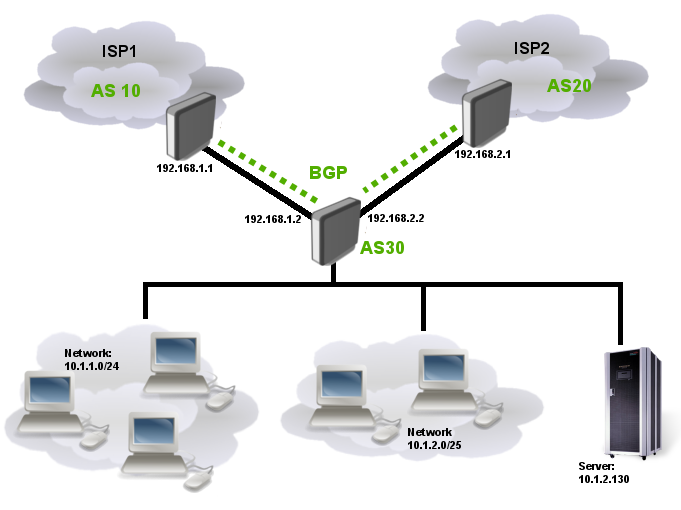
Ilustration below shows simple multihomed BGP setup. This setup can be used for load sharing between ISPs or one ISP as main and other ISP as backup link.
Lets say that local Internet registry assigned to us two /24 networks: 10.1.1.0/24 and 10.1.2.0/24 and our AS is 30 (Private AS cannot be used in such setups). First network entirely is used for workstations in our corporate network. Part of the other network is also used for workstation and another part is reserved for server. At this point our company has only one server with address 10.1.2.130
The goal is advertise our assigned networks to BGP peers and use only one provider as main link, ISP2 link is for backup only.
Note: This example does not show how to provide connectivity between core router, local networks and servers
BGP Peering
Consider that IP connectivity between ISPs edge routers and Our Core router is already set up and working properly. So we can start to establish BGP peering to both ISPs.
#set our AS number
/routing bgp instance
set default as=30

#add BGP peers
/routing bgp peer
add name=toISP1 remote-address=192.168.1.1 remote-as=10
add name=toISP2 remote-address=192.168.2.1 remote-as=20
If everything is set up properly, peer should have E (established) flag and router should receive bunch of BGP routes from both ISPs
[admin@RB1100test] /routing bgp peer> print
Flags: X - disabled, E - established
 #   INSTANCE        REMOTE-ADDRESS                                 REMOTE-AS
 0 E default         192.168.1.1                                    10
 1 E default         192.168.1.2                                    20
Network Advertisements and Routing Filters
Now we can start to advertise our networks and filter out all other unnecessary advertisements.
First step is to advertise our networks
/routing bgp network
add network=10.1.1.0/24 synchronize=no
add network=10.1.2.0/24 synchronize=no
Next step is to specify which routing filter chains will be used
/routing bgp peer
set isp1 in-filter=isp1-in out-filter=isp1-out
set isp2 in-filter=isp2-in out-filter=isp2-out
in-filter is for incoming (received) prefixes, out-filter is for advertised prefixes.
After chains are specified we can accept our networks and drop everything else as we are not transit provider. As you know one of the BGP attributes that influence best path selection is AS Path length (shorter AS Path is more preferred). So as we want ISP2 to be backup only, we will use BGP AS prepend (increase length of AS path) to force incoming traffic through ISP1.
Outgoing filters to ISP1:
/routing filter
#accept our networks
add chain=isp1-out prefix=10.1.1.0/24 action=accept
add chain=isp1-out prefix=10.1.2.0/24 action=accept
#discard the rest
add chain=isp1-out action=discard
Outgoing filters to ISP2:
/routing filter
#accept our networks and prepend AS path three times
add chain=isp2-out prefix=10.1.1.0/24 action=accept set-bgp-prepend=3
add chain=isp2-out prefix=10.1.2.0/24 action=accept set-bgp-prepend=3
#discard the rest
add chain=isp2-out action=discard
We also do not need any routes from both ISPs, because default route is used to force outgoing traffic through ISP1 and leave ISP2 as backup.
/routing filter
add chain=isp1-in action=discard
add chain=isp2-in action=discard
/ip route
add gateway=192.168.1.1 check-gateway=ping
add gateway=192.168.2.1 distance=30 check-gateway=ping
[ Top | Back to Content ]
