Manual:Netinstall: Difference between revisions
| (13 intermediate revisions by 3 users not shown) | |||
| Line 11: | Line 11: | ||
* Download '''Netinstall''' from [https://mikrotik.com/download our downloads] page. | * Download '''Netinstall''' from [https://mikrotik.com/download our downloads] page. | ||
{{ Note | You must choose a version for the Netinstall. If you are not sure, then you can always select the version that is marked as '''Current'''. }} | {{ Note | You must choose a version for the Netinstall. If you are not sure, then you can always select the version that is marked as '''Current''' (stable). }} | ||
* Download RouterOS '''Main package''' from [https://mikrotik.com/download our downloads] page. | * Download RouterOS '''Main package''' from [https://mikrotik.com/download our downloads] page. | ||
{{ Note | You must choose a RouterOS version. You can always select the version that is marked as '''Current'''. You must also select the architecture (ARM, MIPS, SMIPS, TILE, etc...), but if you are not sure, then you can download the | {{ Note | You must choose a RouterOS version. You can always select the version that is marked as '''Current'''. You must also select the architecture (ARM, MIPS, SMIPS, TILE, etc...), but if you are not sure, then you can download the RouterOS package for '''ALL''' architectures, Netinstall will choose the right architecture for you. }} | ||
* Disconnect your computer from WiFi, Ethernet, LTE or any other type of connections! | * Disconnect your computer from WiFi, Ethernet, LTE or any other type of connections! | ||
{{ Warning | Netinstall will only work on one active interface on your computer, it is highly recommended that you | {{ Warning | Netinstall will only work on one active interface on your computer, it is highly recommended that you disable any other network interfaces in order to be sure that Netinstall will select the right network interface. }} | ||
* Configure a static IP address for your Ethernet interface, open '''Start''' and select '''Settings''': | * Configure a static IP address for your Ethernet interface, open '''Start''' and select '''Settings''': | ||
| Line 46: | Line 46: | ||
[[File:Netinstall_Win10_9.png]] | [[File:Netinstall_Win10_9.png]] | ||
{{ Note | It you have a working router, then you can use it and skip the setting up a static IP part of this tutorial, but it requires for you to know your LAN address since you will need to specify an unused IP address in your network for the Network boot server. For this reason it is recommended to apply a static IP address and follow this guide precisely, if you are not sure how to get these parameters out of your network. }} | |||
* Open your '''Downloads''' folder (or wherever you saved the downloaded files) and extract the Netinstall '''.zip''' file to a convenient place | * Open your '''Downloads''' folder (or wherever you saved the downloaded files) and extract the Netinstall '''.zip''' file to a convenient place | ||
| Line 72: | Line 74: | ||
[[File:Netinstall_Win10_12.png]] | [[File:Netinstall_Win10_12.png]] | ||
{{ Warning | The Client IP address must be unique! Don't use an existing IP address in your network, this also means that you should not use the computer's IP address as well. Use a completely different IP address from the same subnet. }} | |||
* Connect your device to your computer using an '''Ethernet''' cable directly (without any other devices in-between), plug the Ethernet cable into your device's Etherboot port. Most commonly, RouterBOARD devices are able to use Netinstall from their first port (Ether1), or from the port marked with "BOOT". | * Connect your device to your computer using an '''Ethernet''' cable directly (without any other devices in-between), plug the Ethernet cable into your device's Etherboot port. Most commonly, RouterBOARD devices are able to use Netinstall from their first port (Ether1), or from the port marked with "BOOT". | ||
[[File:Netinstall_Win10_18.png]] | [[File:Netinstall_Win10_18.png]] | ||
{{ Warning | Some computer's have a network interface (especially USB Ethernet adapters) that tend to create an extra link flap, which is enough for Netinstall to fail to detect a device that is in Etherboot mode. In such case you can use a switch between your device and your computer or a router in bridge mode to prevent this issue. }} | |||
* Power up your device and put it into [[Manual:Etherboot | Etherboot]] mode | * Power up your device and put it into [[Manual:Etherboot | Etherboot]] mode | ||
{{ Note | There are multiple ways how to put your device into Etherboot mode. Make sure you read [[Manual:Etherboot | Etherboot]] manual before trying to put the device into this mode. Methods vary between different MikroTik devices. }} | {{ Note | There are multiple ways how to put your device into Etherboot mode. Make sure you read the [[Manual:Etherboot | Etherboot]] manual before trying to put the device into this mode. Methods vary between different MikroTik devices. }} | ||
* Wait for the device to show up in Netinstall, select it and press '''Browse...''' | * Wait for the device to show up in Netinstall, select it and press '''Browse...''' | ||
| Line 97: | Line 105: | ||
[[File:Netinstall_Win10_15.png]] | [[File:Netinstall_Win10_15.png]] | ||
* Wait for the installation to finish and press "Reboot" | * Wait for the installation to finish and press "Reboot" (Devices without serial console have to be rebooted manually) | ||
[[File:Netinstall_Win10_17.png]] | [[File:Netinstall_Win10_17.png]] | ||
<br /> | <br /> | ||
{{ Note | If the installation does not start (progress bar is not moving or no status is shown), then you can try closing the Netinstall application and opening it up again or try to put the device into [[Manual:Etherboot | Etherboot]] mode again. }} | {{ Note | If the installation does not start (progress bar is not moving or no status is shown), then you can try closing the Netinstall application and opening it up again or try to put the device into [[Manual:Etherboot | Etherboot]] mode again. If you still unable to get Netinstall working, then you should try using it on a different computer since there might be an operating system's issue that is preventing Netinstall from working properly. }} | ||
* You are done! Remove the device from power, remove the Ethernet cable, place the device back in your network and your device should be running properly now! | * You are done! Remove the device from power, remove the Ethernet cable, place the device back in your network and your device should be running properly now! | ||
| Line 168: | Line 176: | ||
</table> | </table> | ||
{{ Note | When using the <var><b>Configure script</b></var> option, it is suggested to introduce [https://wiki.mikrotik.com/wiki/Manual:Configuration_Management#Startup_delay delay] before configuration execution. }} | |||
[[Category:Manual]] | [[Category:Manual]] | ||
[[Category:Basic]] | [[Category:Basic]] | ||
Latest revision as of 14:53, 23 May 2022
Introduction
Netinstall is a tool designed for Windows operating systems to reinstall MikroTik devices running RouterOS (except for non-MikroTik x86 devices). Netinstall re-formats the device's disk and copies over fresh files on to the system's disk, this can solve multiple issues when your device is not working properly. Always try using Netinstall if you suspect that your device is not working properly.

Warning: Netinstall re-formats the system's drive, all configuration and saved files will be lost. Netinstall does not erase the RouterOS license key, nor does it reset RouterBOOT related settings, for example, CPU frequency is not changed after reinstalling the device.
How to use Netinstall
- Download Netinstall from our downloads page.

Note: You must choose a version for the Netinstall. If you are not sure, then you can always select the version that is marked as Current (stable).
- Download RouterOS Main package from our downloads page.

Note: You must choose a RouterOS version. You can always select the version that is marked as Current. You must also select the architecture (ARM, MIPS, SMIPS, TILE, etc...), but if you are not sure, then you can download the RouterOS package for ALL architectures, Netinstall will choose the right architecture for you.
- Disconnect your computer from WiFi, Ethernet, LTE or any other type of connections!

Warning: Netinstall will only work on one active interface on your computer, it is highly recommended that you disable any other network interfaces in order to be sure that Netinstall will select the right network interface.
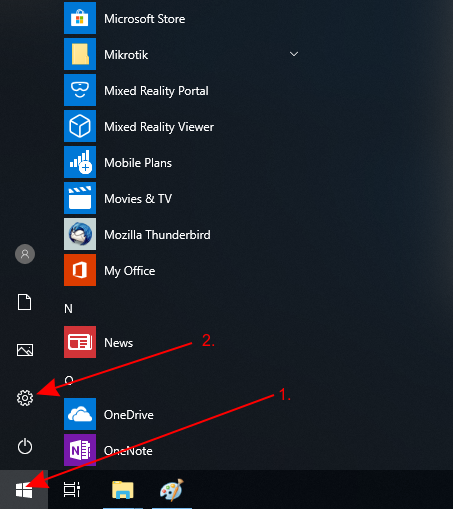
- Configure a static IP address for your Ethernet interface, open Start and select Settings:

Note: Netinstall can run also on a local network, in such case you could skip setting a static IP address, but it is highly recommended that you set a static IP address if you are not familiar with Netinstall.
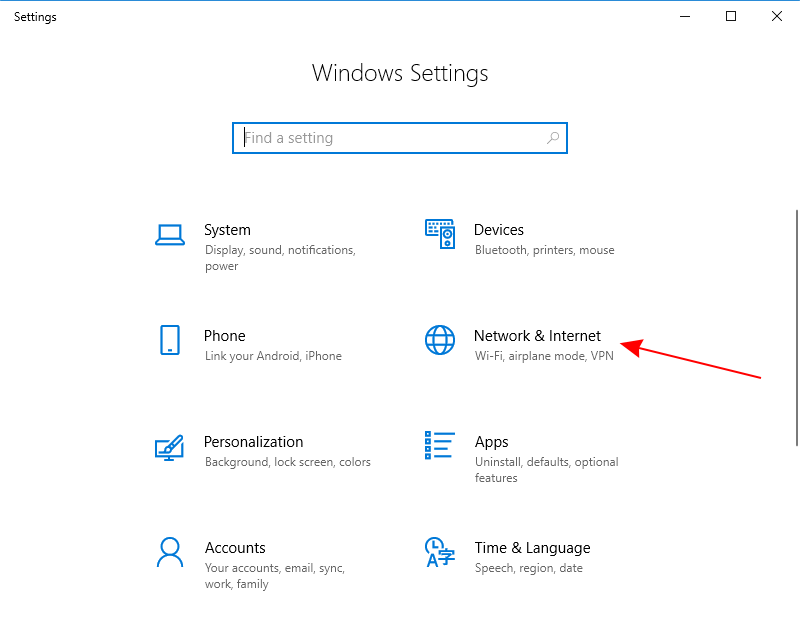
- Open Network & Internet
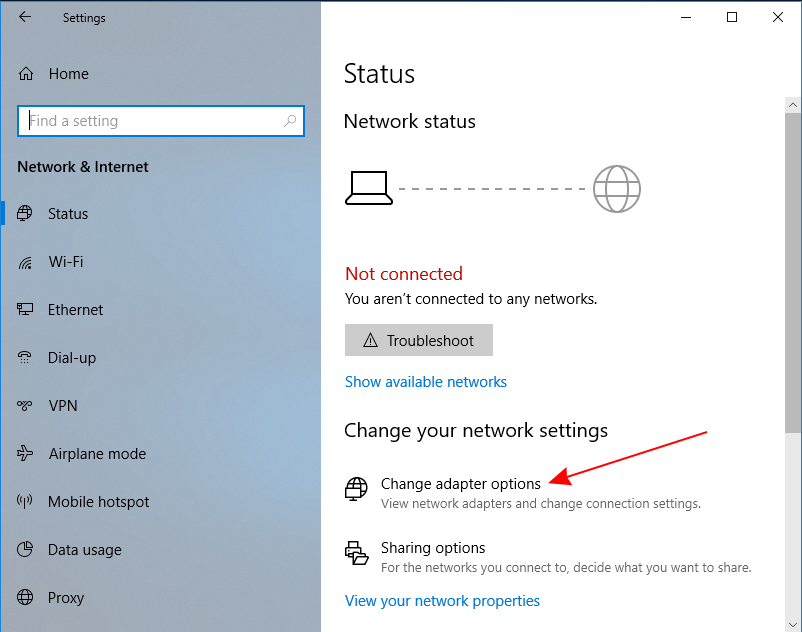
- Select Change adapter options
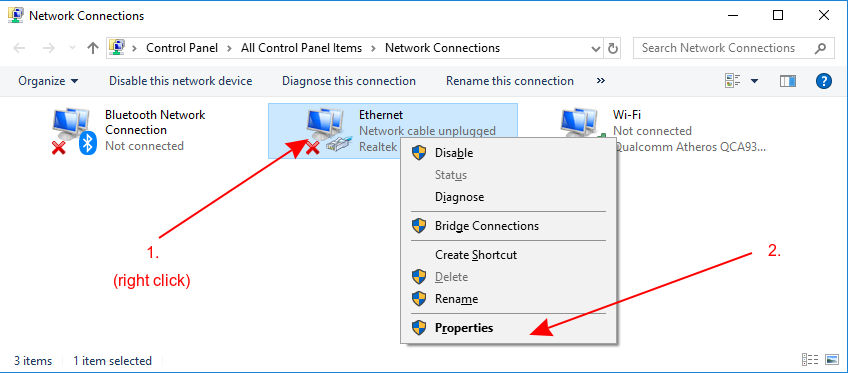
- Right click on your Ethernet interface and select Properties
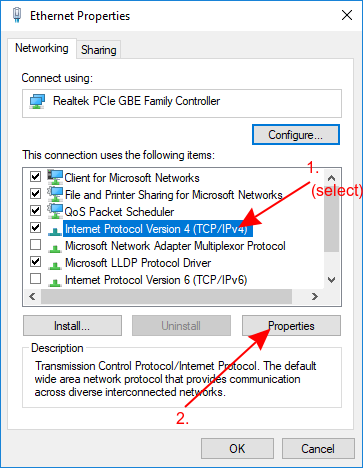
- Select Internet Protocol Version 4 (TCP/IPv4) and click Properties
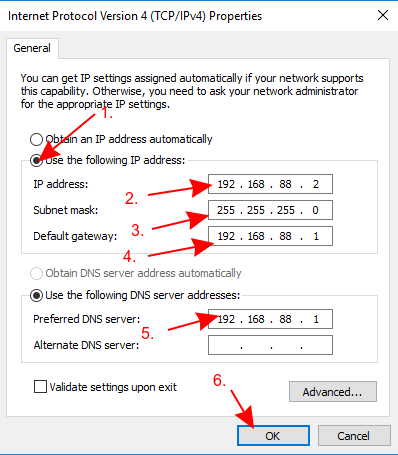
- Check Use the following IP address and fill out the fields as shown in the image below

Note: It you have a working router, then you can use it and skip the setting up a static IP part of this tutorial, but it requires for you to know your LAN address since you will need to specify an unused IP address in your network for the Network boot server. For this reason it is recommended to apply a static IP address and follow this guide precisely, if you are not sure how to get these parameters out of your network.
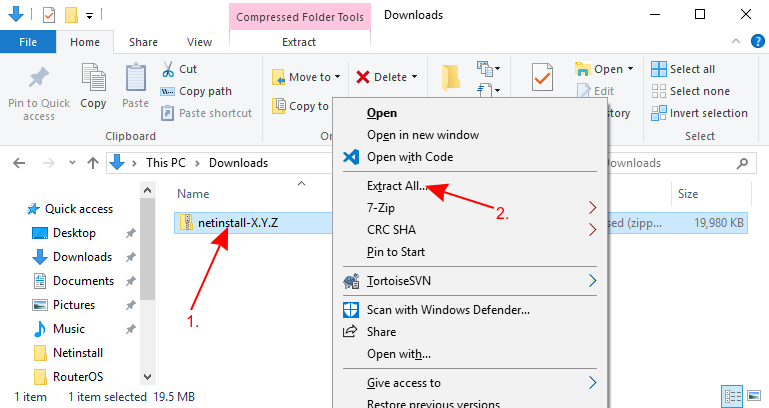
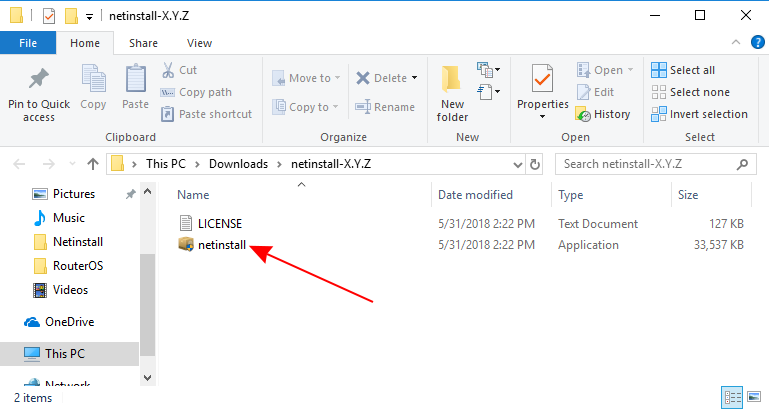
- Open your Downloads folder (or wherever you saved the downloaded files) and extract the Netinstall .zip file to a convenient place
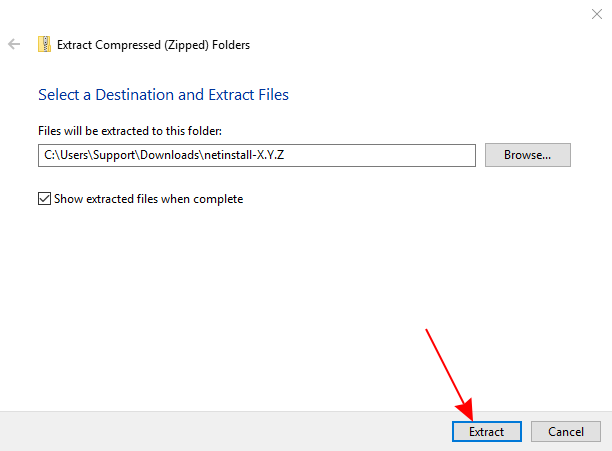
- Extract the files
- Run Netinstall.exe

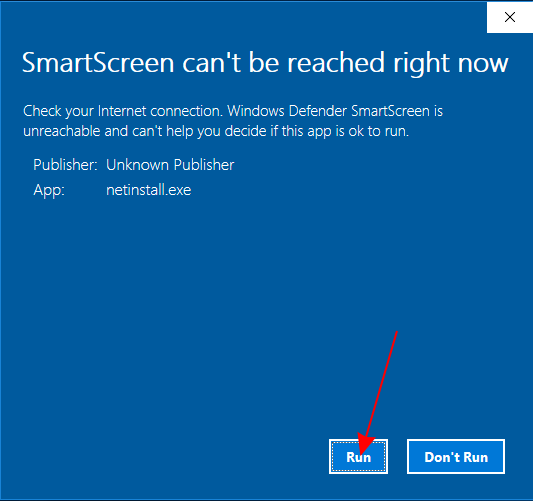
Note: If you followed the guide precisely, then you should not have any Internet connection on your computer, Windows 10 wants to verify all apps that it runs, but will not be able to do it since lack of the Internet connection, for this reason a warning might pop up, you should click Run.

Warning: Netinstall requires administrator rights, there should be a window asking for permissions to run Netinstall, you must accept these permissions in order for Netinstall to work properly.
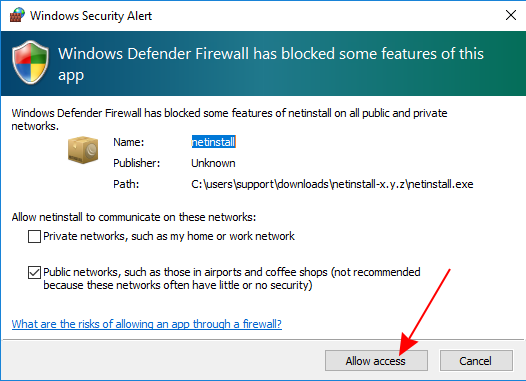
- Allow access for Netinstall in Public networks
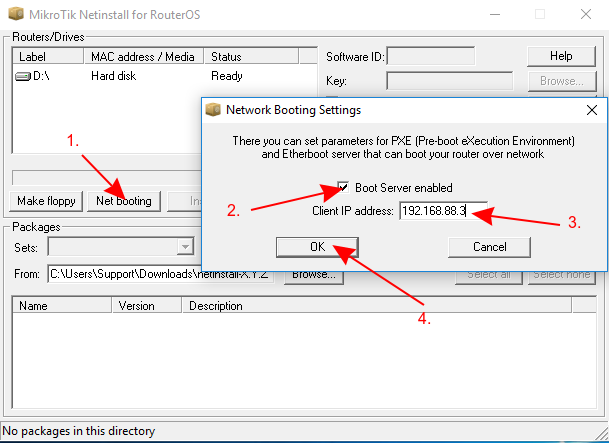
- Configure Net booting settings and fill out the required fields as shown in the image below

Warning: The Client IP address must be unique! Don't use an existing IP address in your network, this also means that you should not use the computer's IP address as well. Use a completely different IP address from the same subnet.
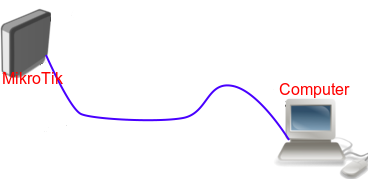
- Connect your device to your computer using an Ethernet cable directly (without any other devices in-between), plug the Ethernet cable into your device's Etherboot port. Most commonly, RouterBOARD devices are able to use Netinstall from their first port (Ether1), or from the port marked with "BOOT".

Warning: Some computer's have a network interface (especially USB Ethernet adapters) that tend to create an extra link flap, which is enough for Netinstall to fail to detect a device that is in Etherboot mode. In such case you can use a switch between your device and your computer or a router in bridge mode to prevent this issue.
- Power up your device and put it into Etherboot mode

Note: There are multiple ways how to put your device into Etherboot mode. Make sure you read the Etherboot manual before trying to put the device into this mode. Methods vary between different MikroTik devices.
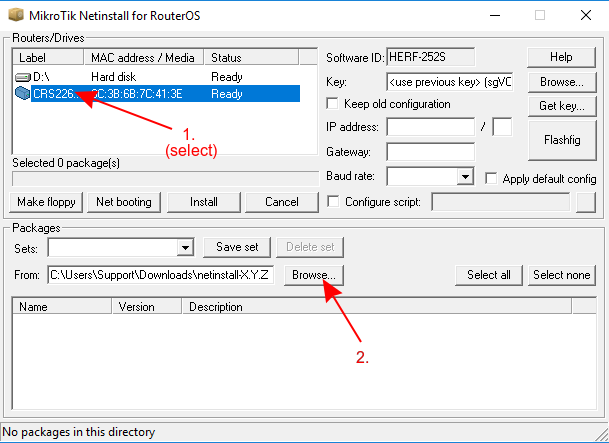
- Wait for the device to show up in Netinstall, select it and press Browse...

Note: If the device does not show up in this window, then you can try closing the Netinstall application and opening it up again or try to put the device into Etherboot mode again.
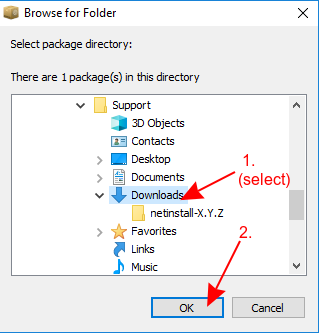
- Navigate to your Downloads folder (or wherever you saved your RouterOS packages) and press OK
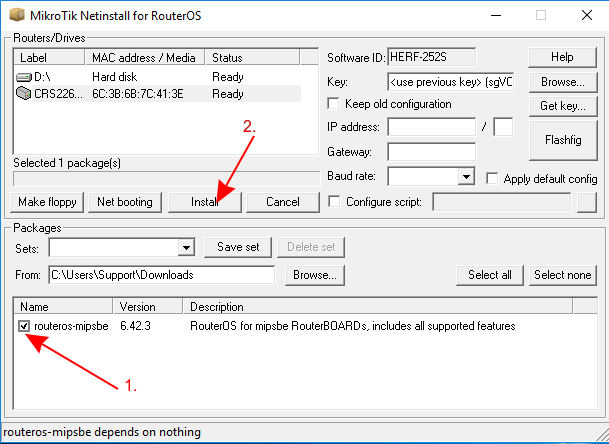
- Select your desired RouterOS version and press Install

Note: If you downloaded RouterOS packages for multiple architectures, then Netinstall will only show the appropriate architecture packages for your device after you have selected it. All unsupported packages will not show up in this window after you have selected a device.
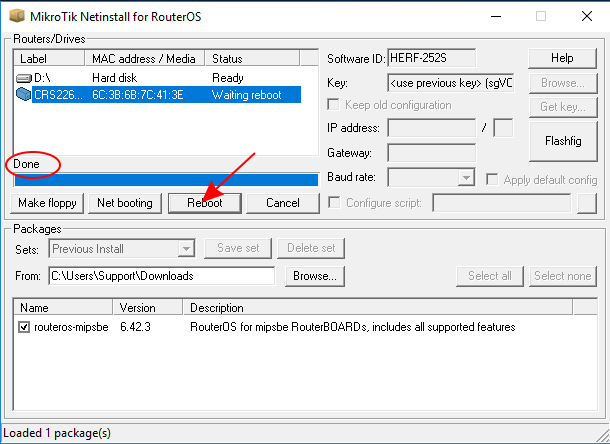
- Wait for the installation to finish and press "Reboot" (Devices without serial console have to be rebooted manually)

Note: If the installation does not start (progress bar is not moving or no status is shown), then you can try closing the Netinstall application and opening it up again or try to put the device into Etherboot mode again. If you still unable to get Netinstall working, then you should try using it on a different computer since there might be an operating system's issue that is preventing Netinstall from working properly.
- You are done! Remove the device from power, remove the Ethernet cable, place the device back in your network and your device should be running properly now!

Note: After using Netinstall the device will be reset to defaults (unless you specified not to apply default configuration). Some devices are not accessible through ether1 port with the default configuration for security reasons. Read more about Default configuration.
Properties
| Property | Description |
|---|---|
| Routers/Drives | list of system drives on which RouterOS can be installed and list of routers that were detected to be in Etherboot mode. When installing RouterOS on a drive, the drive is going to be formatted, make sure you have saved all information from that drive. |
| Make floppy | used to create a bootable 1.44" floppy disk for PCs which don't have Etherboot support. |
| Net booting (yes | no; Default: no) | Used to enable PXE booting on your network, should be enabled and configured to have an IP address of your network in order for Netinstall to function properly. |
| Install/Cancel | After selecting the router or drive and selecting the RouterOS packages below, use this to start or stop the installation. |
| SoftID (Ready-only) | The Software-ID that belongs to the router. Use this ID to purchase a key for your device if required. |
| Key (use previous key | browse | get key; Default: use previous key) | Specify the licence key for your RouterOS device, use the previous key (if your device already has a licence key), apply the purchased key (if your device does not have a license) by selecting Browse or retrieve a key from your mikrotik.com account directly using a prepaid key, a deposit or credit card by selecting Get key, or leave it blank to install a 24h trial version (the device will not be accessible after the trial has expired). |
| Flashfig | Launches the Flashfig utility, which can be used to apply a custom configuration on new devices easy and fast. |
| Keep old configuration (yes | no; Default: no) | Keeps the configuration that was on the router, just reinstalls the software (does not remove the current configuration)/ |
| IP address/Netmask (IP address/Netmask; Default: ) | If set, then Netinstall will apply the specified IP address after installing RouterOS. |
| Gateway (IP address; Default: ) | If set, then Netinstall will apply the specified gateway address after installing RouterOS. |
| Baud rate (integer; Default: 115200) | If set, then Netinstall will apply the specified baudrate for serial console after installing RouterOS. |
| Apply default config (yes | no; Default: no) | Applies default configuration on the device. If not selected and Baud rate, Gateway, IP address/Netmask and Configure script is not set, then the default configuration will be applied. |
| Configure script (yes | no; Default: no) | If set, then Netinstall will apply a custom configuration script after installing RouterOS. The file must be in .rsc file format and must be produced by the export command. The configuration script will replace the device's default configuration and will be applied each time you reset your device back to the default configuration. Resetting the device without the default configuration is not affected. This behaviour can be reverted using Netinstall and by selecting Apply default config. |

Note: When using the Configure script option, it is suggested to introduce delay before configuration execution.
