Manual:Webfig: Difference between revisions
m →Designing skins: introducing status page |
|||
| Line 112: | Line 112: | ||
{{Note|Limitations set for combo-boxes will values selectable from dropdown}} | {{Note|Limitations set for combo-boxes will values selectable from dropdown}} | ||
====Status page==== | ====Status page==== | ||
{{Note|Starting RouterOS 5.7 webfig interface adds capability for users to create status page where fields from anywhere can be added and arranged. | |||
When status page is created it is default page that opens when logging in the router through webfig interface. | |||
======Addition of fields====== | |||
To add field to status page user has to enter "Design skin" mode and from drop-down menu at the field choose option - "Add to status page" | |||
As the result of this action desired field in read-only mode will be added to status page. If at the time ''Status'' page is not present at the time, it will be created for the user automatically. | |||
======Two columns====== | |||
Fields in ''Status'' page can be arranged in two columns. Columns are filled from top to bottom | |||
====Skin design examples==== | ====Skin design examples==== | ||
Revision as of 08:46, 22 September 2011
Summary
WebFig is a web based RouterOS configuration utility. It is accessible directly from the router and no additional software is required (except web browser with JavaScript, of course).
As Webfig is platform independent, it can be used to configure router directly from various mobile devices without need of a software developed for specific platform.
WebFig is designed as an alternitive of WinBox, both have similar layouts and both have access to almost any feature of RouterOS.
Connecting to Router
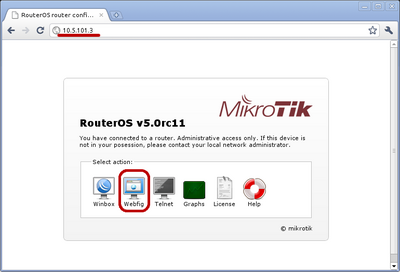
WebFig can be launched from the routers home page which is accessible by entering routers IP address in the browser. When home page is successfully loaded, choose webfig from the list of available icons as illustrated in screenshot.
After clicking on webfig icon, login prompt will ask you to enter username and password. Enter login information and click connect.
Now you should be able to see webfig in action.
IPv6 Connectivity
RouterOS http service now listens on ipv6 address, too. To connect to IPv6, in your browser enter ipv6 address in square brackets, for example [2001:db8:1::4]. If it is required to connect to link local address, don't forget to specify interface name or interface id on windows, for example [fe80::9f94:9396%ether1].
Interface Overview
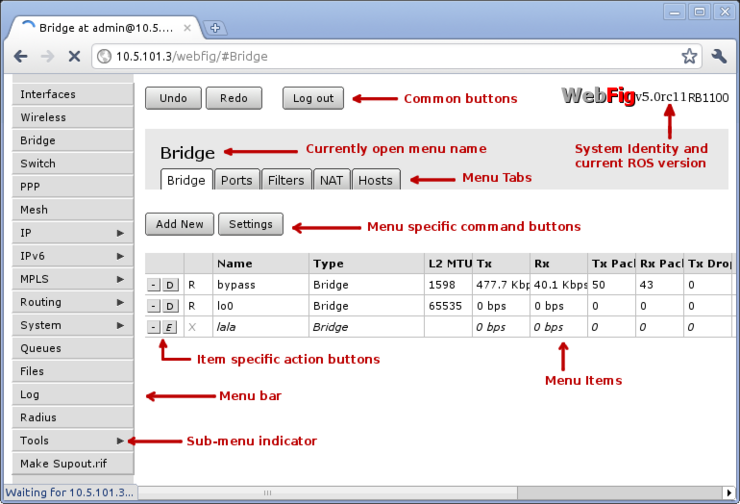
WebFig interface is designed to be very intuitive especially for WinBox users. It has very similar layout: menu bar on the left side, undo/redo at the top and work are at the rest of available space.
When connected to router, browsers title bar (tab name on Chrome) displays currently opened menu, user name used to authenticate, ip address, system identity, ROS version and RouterBOARD model in following format:
[menu] at [username]@[Router's IP] ( [RouterID] ) - Webfig [ROS version] on [RB model] ([platform])
Menu bar has almost the same design as WinBox menu bar. Little arrow on the right side of the menu item indicates that this menu has several sub-menus.
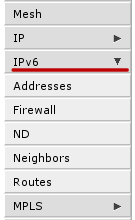
When clicking on such menu item, sub-menus will be listed and the arrow will be pointing down, indicating that sub-menus are listed.
At the top you can see three common buttons Undo/Redo buttons similar to winbox and one additional button Log Out. In the top right corner, you can see WebFig logo and RouterBOARDS model name.
Work area has tab design, where you can switch between several configuration tabs, for example in screenshot there are listed all tabs available in Bridge menu (Bridge, Ports, Filters, NAT, Rules).
Below the tabs are listed buttons for all menu specific commands, for example Add New and Settings.
The last part is table of all menu items. First column of an item has item specific command buttons:
Item configuration
When clicking on one of the listed items, webfig will open new page showing all configurable parameters, item specific commands and status.
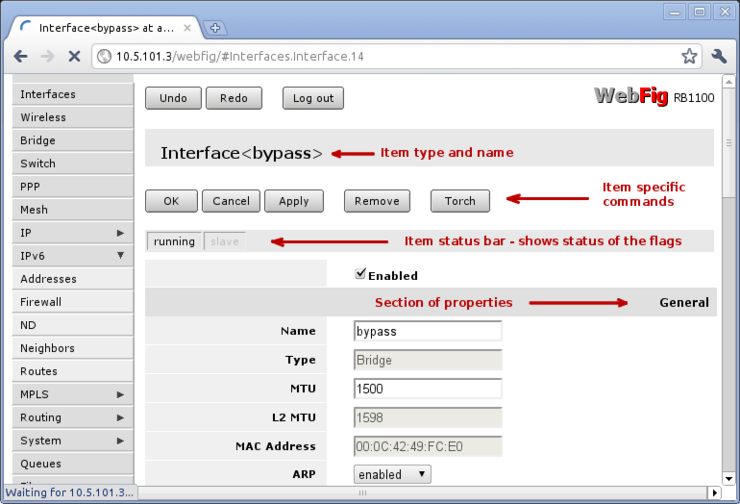
At the top you can see item type and item name. In example screenshot you can see that item is an interface with name bypass
There are also item specific command buttons (Ok, Cancel, Apply, Remove and Torch). These can vary between different items. For example Torch is available only for interfaces.
Common Item buttons:
- Ok - apply changes to parameters and exit;
- Cancel - exit and do not apply changes;
- Apply - apply changes and stay on current page;
- Remove - remove current item.
Status bar similar to winbox shows current status of item specific flags (e.g running flag). Grey-ed out flag means that it is not active. In example screenshot you can see that running is in solid black and slave is grey-ed, which means that interface is running and is not a slave interface.
List of properties is divided in several sections, for example "General", "STP", "Status", "Traffic". In winbox these sections are located in separate tabs, but webfig lists them all in one page specifying section name. In screenshotyou can see "General" section. Grey-edout properties mean that they are read-only and configuration is not possible.
Work with Files
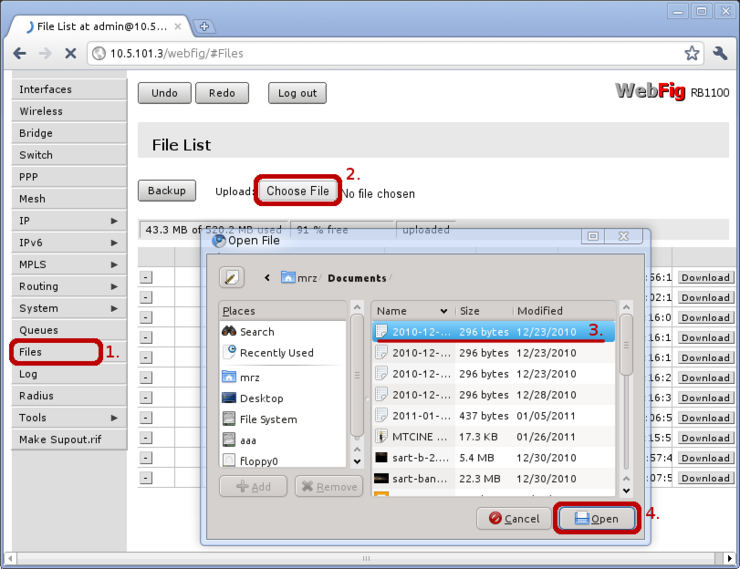
Webfig allows to upload files directly to the router, without using FTP services. To upload files, open Files menu, click on Choose File button, pick file and wait until file is uploaded.
Files also can be easily downloaded from the router, by clicking Download button at the right side of the file entry.
Traffic Monitoring
[ Top | Back to Content ]
Skins
Webfig skins is handy tool to make interface more user friendly. It is not a security tool. If user has sufficient rights it is possible to access hidden features by other means.
Designing skins
If user has sufficient permissions (group has policy edit permissions) Design Skin button becomes available. Pressing that toggle button will open interface editing options. Possible operations are:
- Hide menu - this will hide all items from menu and its submenus;
- Hide submenu - only certain submenu will be hidden
- Hide tabs - if submenu details have several tabs, it is possible to hide them this way;
- Rename menus, items - make some certain features more obvious or translate them into your launguage;
- Add note to to item (in detail view) - to add comments on filed;
- Make item read-only (in detail view) - for user safety very sensitive fields can be made read only
- Hide flags (in detail view) - while it is only possible to hide flag in detail view, this flag will not be visible in list view and in detailed view;
- Add limits for field - (in detail view) where it is list of times that are comma or newline separated list of allowed values:
- number interval '..' example: 1..10 will allow values from 1 to 10 for fiels with numbers, example, MTU size.
- field prefix (Text fields, MAC address, set fields, combo-boxes).

Note: Set fields are argument that consist of set of check-boxes, for example, setting up policies for user groups, RADIUS "Service"
Status page
{{Note|Starting RouterOS 5.7 webfig interface adds capability for users to create status page where fields from anywhere can be added and arranged.
When status page is created it is default page that opens when logging in the router through webfig interface.
Addition of fields
To add field to status page user has to enter "Design skin" mode and from drop-down menu at the field choose option - "Add to status page"
As the result of this action desired field in read-only mode will be added to status page. If at the time Status page is not present at the time, it will be created for the user automatically.
Two columns
Fields in Status page can be arranged in two columns. Columns are filled from top to bottom
Skin design examples
Set field
Setting limits for set field
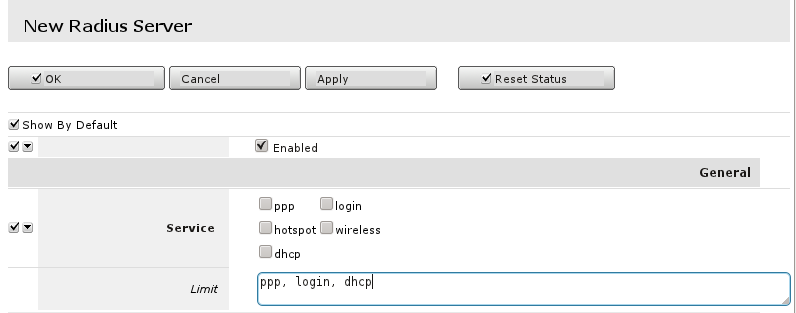 And the result:

Using skins
To use skins you have to assign skin to group, when that is done users of that group will automatically use selected skin as their default when logging into Webfig.
If it is required to use created skin on other router you can copy files to skins folder on the other router. On new router it is required to add copied skin to user group to use it.
